Showing posts with label crafts. Show all posts

Thursday, April 2, 2015

Spring Fever

Hyacinths, daffodils, forsythia, yellow jessamine, honeysuckle, and now the azaleas are all bursting into bloom.  It means our short Spring has arrived.  For the next two weeks, warmer temperatures and that longing to throw windows and doors open has to be ignored.  All the flowers and pine trees are filling the air with clouds of fine yellow pollen that piles up
everywhere, and makes my nose itch and sneeze and I have to bathe my burning eyes several times a day.

Going out is risky business, so now that I am stuck indoors, and sorta-kinda done with taxes, I took a break and got creative today.  Out came strings of turquoise beads and silvered chains and wire and anything that looked remotely good with turquoise.  I didn't get any serious tools or torches out today and just enjoyed the ease of beading.  This is a long necklace with dyed howlite or magnesite beads, carved turquoise beads, old "silver" trade beads, a sterling Hamsa hand, and a tiny Tibetan prayer box charm.  The tassel is hand-dyed silk.

This next necklace also has turquoise nuggets, tiny carved bone beads and dragon, and antique bronze metal with a hand-dyed silk cord and tassel.  I squeezed that in about three weeks ago.


Sunday, March 15, 2015

Let There Be Beautiful Light

This week in the studio, I was working away at one project and in typical ADD/ADHD fashion, another idea sideswiped me to set what I was doing aside and do this...


I did this with 3 feet by 12 inches of organza, about 5 feet of brassy beads, and a sheet of floral paper.  The chandelier chain was about 2 feet long.
  1. Tuck the fabric in at the top of the chandelier, perhaps anchoring it with thread or a tiny wire.
  2. Spiral it around evenly and tuck the bottom edge in.
  3. Wrap the beads from the center, going around snugly twice a the top and then crisscrossing them to the bottom where I used a thin piece of wire to clasp together.
  4. I cut the paper into strips and made tubes that fit around the plastic tubes under the lights
Time:  maybe 30 minutes


Sunday, November 16, 2014

Darn Good Gumbo & We Had a Great Time

It was chilly, and we walked everywhere.
With eyes peeled for beads, I found a few primitive bead strings too.

 I scored lots of interesting focals ... some of them vintage


I also found some great clasps for some multi-strand bracelets, and charms.....


Did I say it was cold?  One might think that Asheville, NC would be a good place to find warmer clothing bits and pieces.  I wanted to find some comfy sweater leggings to go with my new boots, but all I saw were synthetic yukkies.  There seem to be quite a few to select from online, so I will keep fingers crossed. 
(Yes, I am a fiber snob)
We had lunch the first day at Mayfel's  a New Orleans style bistro, and I had the BEST gumbo.  I have to make some now that I am back home.  There is a gumbo recipe that I found in my Grandmother's circa 1900 cookbook that I like a lot, but the DH won't eat okra.  Even though there is not a hint of goo, he has a mental thing about it.  It's darn good gumbo though!  I make mine with chicken and ham (or not), and Mayfel's cooked it up with Anduille sausage in it.  ...They also had beignets.  Oh yeah!  They are a New Orleans delicacy that are very like crispy fried doughnuts, served hot and sprinkled with powdered sugar.   I can't begin to tell you how decadent they are on a cold day with a cuppa hot chicory coffee.  Mayfel's didn't have the chicory coffee, but they did have darn good coffee just the same.

We had a few meals from Katuah, a natural food store's salad table.  Good stuff.  We got some smoked chicken thighs that were so good that the DH is thinking to re-create them here.  Our last day out, we walked around Black Mountain and mid-way through the afternoon we stopped in our fav restaurant and shared a devilishly fudg-i-licious giant slice of chocolate cake and hot tea.  What a warm up that was.
We usually wear ourselves out with walking and sensory overload, and we like to be back at the hotel by late afternoon.  I usually take a portable project.  Remember the BedSack Frock?   It had been stashed away for over a year waiting for the next inspiration.  It has been on my mind ever since I returned from Pennsylvania in September.   I had taken it along and got artsy there with leaves.  I painted fallen oak leaves with fabric paints and pressed them to the fabric.  At the time, I wasn't exactly happy with the result.  Fall colors are not really my piece of cake, and the colors seemed heavy on the muslin canvas.  The next step might have been patching over those leaves.


However, the idea of embroidered water struck days before we left, and so I went armed with blue floss and a trusty needle, and got a lot of embroidery done on the BedSack.  I was stitching the creek.  I like how it's going.  It reminds me of Gustav Klimt with its curls and spirals.  ...Not too much though, cuz its not a raging torrent.  ...Kind of fun to just do whatever with long running stitches and patches of French knots.  The darker blue seems to balance and hold the leaves now, so the plan is to keep them.


One thing I found interesting as we munched on cake and looked out the window of our restaurant, watching the passers by, was that several were carrying newly purchased snow shovels and coasters.  It was beautiful and sunny in the 50's and 60's.  Weather was moving in this week!  It will be below freezing here too.  We have already had snow which is unheard of, and it may be a strange winter.

Tuesday, July 15, 2014

Choices & Facing Demons

I have not been posting for quite a while now.  I have not been creative either.  It seems they go hand in hand.  After the respite, I had to get ready for company.  Now, I hate to admit, but I am a messy artisan.  I get tunnel-vision and tear threw projects like  a tornado and make the biggest messes.  SO, getting ready for company is a "deer-in-the-headlights" moment for me.  Big reality check!!!!  To use another animal phrase, I had the "elephant in the living room" look.  Cleaning up after myself is fraught with decisions and such a bore because there is so much more fun to be had than the drudgery of housework.  However, once I got the living areas of the house looking company ready, I felt so much better about the view, and have determined that I am going to keep them clear and re-organize my everything room into a real studio.  I have been reading a very helpful book by Julie Morgenstern, named Organizing From the Inside Out.  I am such a hopeless case that I have to admit that I started this books years ago and never got beyond the third chapter.  For several years now, I have had a reminder on my bulletin board that "This will be the year that will end my clutter!"  I took it down this January 1 because I didn't want it nagging at me ANY MORE.  Little did I know what was in store for me just a few months ahead.

The thing I like about this author is that her story is just like mine.  She found a way to tackle her problem, and that gives me hope.  I also really really really really really want to have a beautiful clean and ready space to work in and to be able to walk into my studio without twisting and turning around piles and boxes of things that got there from previous quick clears for company visits.

Looking ahead, I have been planning out the new workspace on Pinterest and getting excited about having an optimum place to work with my supplies and tools all at hand with good lighting and and and and and.....

But in the meantime, I am struggling.  I pace the floors because I am not being creative and making jewelry, or sewing items I need, or knitting garments I want , and all those other projects that I have set for myself on Pinterest and that is just a start.  Julie suggests that we start setting up the space as soon as enough clearing will allow because it sets up a feeling of progress and reward.  This would be the solution for me, but I need to clear out the corner of the room, find someplace for all the clutter on the worktable and move a heavy 60" table, that has been used for paperwork, over by the window where it will be a craft table instead.

Anyway, here I am, publicly declaring to be a clutter addict ...resolving to change my ways.  I will post my progress every week until I get there, and be proud to share my new space at that time.  As I go, I will share my plans and dreams with you for my perfect space. 

Friday, April 25, 2014

Epiphany

There's nothing like going through life, passing Middle Ages and getting into the "Senior" category and still you don't really know what you want to be when you grow up.  In my case, I just enjoyed doing so many things that I haven't been able to decide.  So, the other day I made myself one of "those" lists and wrote down all the things I like that could be considered my Artisan ID.   In case you are head-scratching now, that's when you can be exposed to a created piece and know who did it.  Whether it is music or art or a fashion style, you just know who created it.  That's what I have been trying to figure out for months now.  However, even the list didn't help much to clarify my own definition, but the following morning whilst showering, I was hit with one of those thoughts that often come while I am relaxing and letting the hot water pour over me.  Why had I never thought of this in relation to my wardrobe?  My sewing over the decades has really defined me.  I know exactly what styles I like and will wear, and when I applied that same criteria to the jewelry making, my brain lit up like the fireworks on July 4th.  I have been excited about discovering myself ever since!

Inspiration hit me then too.  After looking over my boards on Pinterest for a few hours, I started to get ideas on what I wanted to put together, and here is what happened....  


Tuesday, April 1, 2014

Spring is here!

With every end of the month I take inventory and ask myself what I most want to accomplish before the next month sets in.  It's about completion and feeling good about myself.  March winds seemed to blow hard on us symbolically here and brought chaos and changes that were not expected.  Even though last weeks Bad Business was a nightmare, it held within it the opportunity to spend longer moments with my passion.  Interrupted too often with endless aggravations, concentrating on taxes was out of the question.  So, I worked on jewelry.  Not only did it keep me calmer and more in control, but it was possible to finish a piece I began several weeks ago.  
I have been lusting over the idea of a lime green bracelet for ages and this little birdie sang an inspirational song to me.  I can hardly believe that I created this piece because it is so very different from anything I have ever done to date.  I used new skills that I picked up in Stephanie LeBaron Lee's Homesteaders Metalsmithing e-course.  There was such a wealth of information in it that I have barely touched the surface yet.  Just get me through taxes and will I ever have fun!!!


Wednesday, January 1, 2014

French Script Candles


Here it is as promised!  These candles are reallyeasy and so lovely to look at.  However, and this is a BIG however, they must be used with great care.  Because they are wrapped with tissue paper, they are a danger for fire flare, and wax can burn in a very combustible way.

Take careful precautions!

So, here I am, warning you before you go any further, because this is a "use at your own risk" kind of thing!  I absolve myself of any dangerous results of burning these candles!!!!


 What you will need:
  • candles  ...cheap candles usually have a higher flammability factor, but I actually saw a beeswax candle catch fire once at a friend's party and believe me, it flared up fast.  Use the best quality candle you can afford
  • white tissue paper
  • a printer!
  • something to print.  Go on a Pinterest or Google image search and you can find lots of great things to print: French script, music pages, recipes, small flowers or other shapes
  • a hair curling iron
  • scissors
  • tea bags

What to do:


Prepare the tissue paper:  Use a few tea bags and pour boiling water over just to cover and release the tea.  Next, tint your paper irregularly by gently dabbing and brushing it with the wet tea bags.  The paper is very fragile, and can tear easily when wet, so be very light handed.  Allow paper to dry thoroughly.  If you are as impatient as I am, you can use a hairdryer to speed this along.  Cut the dried paper into 8 1/2" X 11" pieces.  Tape a piece to a regular sheet of printer paper along the lead edge (the top).


Prepare the image:  If you are using text or any image that has a right side view, create a mirror (or backwards) image.  This can be easily done in the Paint  software that is installed on most computers.  Simply copy and paste your image there and use the "flip horizontal" button.  Then, take your image back to Word, and paste it on your page.  I set my page layout to have 1/2" margins and then dragged the image out to fit the entire printable area.  The candles I used are very tall, and so I wanted to use the full length of the page.  Place the paper with the tissue side down, and print your page.  Sometimes this is a fiddly procedure, as printers are often finicky things and refuse to print or eat the page just to be spiteful.  Keep trying!   I was able to wrap three candles from one printed page, just determine how many you will need.  I printed an extra one just in case.


Prepare the paper:   I trimmed the top margin off the paper by cutting irregularly and close to the script.  I could have torn it, but since the edge becomes invisible this is not important.  Just get fairly close to the script.  Also, trim the left margin away.


HOORAY!!!!  Now the fun part!


Making the candle:  

Heat your curling iron.
Line up the candle alongside the paper making sure the script is right side out, and not upside-down.  Top of page faces the top of the candle, about an inch down from the top of the side of the candle.  Roll the paper with the candle until you can line up the lines of script, creating a free flow for the image.


Holding the tissue in place, begin to slowly run the curling iron over the edge of the paper.  The candle surface will start to melt and adhere the tissue to the candle.  You will see that the tissue takes on a translucent look and disappears into the candle when it is properly adhered.  Continue to burnish along the candle until the paper is well-adhered and you have nearly completed encircling the candle.  You may occasionally have to slow down and let the iron reheat.


Use your scissors to cut the tissue, allowing for a smidgen of overlap.


Next, burnish in the edge to complete the adhering process.  Inspect your candle to make sure it is evenly burnished and the tissue is translucent throughout.  As a final touch, Press your curling iron into the bottom of the candle to adhere the tissue to the base and fluting the edge slightly so it will fit into a candle holder more easily.


Thursday, December 26, 2013

Merry Christmas to all of you and my very intent wishes for all of us to have a fantastic and wonderful New Year!


I have had my hands full this past month, but I have a special project all lined up to share with you that I think you will like.  Stay tuned for my next blog on how I made these French script candles....

Thursday, February 28, 2013

The Twelve Month Mantle

I have slipped up!  I though that I had already written about my mantle challenge, but I see that I had not even posted at all about it.  Ah how sad that it got away from me.  Well, no time like the present to catch you up on that.  It occurred to me as I was putting away the Christmas decorations how much I miss the color and sparkle of those decorations.  The house suddenly seems less magical and alive.  Because we spend so much time in the living room, and our view is directed toward the fireplace, the mantle is a prime focal for decor.  ...What?!!!  I never shared a photo of the Christmas mantle?  Well,. here it is...


This was standard for years, and this past year I decided that it would be nice to tweak it a little.  I had been saving a fallen branch (I am just compulsive that way) and decided it would be interesting to use it in some way.  I dabbed white paint over the branch, and used nails that usually hold pictures, to hang the branch with fine fishing line.  Then, I cut stars out of those pieces of cardboard that you find in various retail products.  I could have used cereal boxes, but this kitchen warrior does not buy that sort of processed food.  I used a punch to make a hole for hanging.  Then, I spray painted them silver and when they were dry dabbed them with some Gesso.  That was not necessary, but I wanted to get some texture and maybe relate them to the white branch.  ...Kinda like clouds and kinda shabby chic too. Next, I strung the stars to varying lengths of invisible nylon thread and wrapped them to the branch.  Wrapping the branch about three or four times held just fine, and when dismantled was easy to remove.


 My plan included adding a string of tiny lights, but they refused to light this year.  ...But never mind!

SO, when January came along and Christmas went back into boxes, I just couldn't bear to hide all the cheer away.  There was one box of decorations that had been ignored for many, many years.  It held old wooden shapes that my father had made from a craft project in some woman's magazine.  It was a table centerpiece with cookie cutter trees and children.  Somehow there was never room on the table for that.  Yet here they were, and perfect for the mantle as a January scene of starry forest night. 


I liked that so much that I decided to challenge myself to keep the branch all year, and change the decor to honor every month of the year.  Now, here we are into the last day of February, and I must share what happened this month before it's gone too.  

So what is in store for March?  Dunno yet, but I suspect it will have something to do with Leprechauns and shamrocks, pots of gold or maybe the first hints of spring and nature shaking off the winter.


Tuesday, February 19, 2013

Just a Little Cabin in the Woods

Memories...
the old cabin
 Sometimes I get obsessed with an idea that just stews in my brain until I do something about it.  For months now, I have been obsessing about Amanda, the grandmother I never knew.  One of the things she accomplished was to supervise the construction of a cabin built in the "Endless Mountains" in Pennsylvania.  Long ago, Native Americans named the a portion of the Appalachian Mountain chain as the "Endless Mountains."  Building a cabin had been a plan that she shared with my grandfather before he passed on, and in her strength, she saw the plan through so that the family would have a place of respite.  It was a time when people still rallied together to raise a home for a family, and she was fortunate to have "Great Uncle Barney"  to help out. Great Uncle Barney was a builder of barns, and he knew how to put strength into a cabin.  It could have lasted forever.  I say "could" because we lost the cabin several years ago.  A fraudulent contractor, who was hired to put new shingles on the roof, left his old faulty truck to  catch fire and sent the cabin into destruction.  Since then, a new cabin has risen in the old one's place, but the memories and the feeling of the original will be with me always.


My favorite view in all this world ...from the cabin porch swing
I loved nothing better than to sit on the front porch swing and "zone" as I gazed out into the beauty of nature.  It is a bountiful view full of life and sound.  A shallow creek flows by, happily gurgling it's way over rocks as the sunlight sparkles over it.  Damselflies with the deepest iridescent indigo or jade green bodies and lacy black wings dance off it's surface.  Crows add their voices in disrespect of the peace and quiet as they call back and forth, asserting their territory.  Beyond is a field of tall grasses occasionally dotted with scarlet-red bee-balm, delicate white Queen Anne's Lace and daisies.  Across the old dirt road, deer visit an old gnarled apple tree (it's in bloom in the right center of the photo) in the field where I gathered mint, yarrow and other wild herbs.  I would harvest them in the early morning, wash them and then hang them in bunches over the kitchen's old wood-burning stove to dry.

It has been many years now since I was last there.  It used to be an annual two week stay when my mother was living nearby.  Over a decade ago she sold her home and has been living with me, my sister, and now me again.  Her health and my care-giving will not allow for travel.  So, I travel in my mind to this haven of peace and regeneration.

Recently, I took into my head to honor both the cabin and Amanda with a soldered pendant.  My first effort at soldering leaves much to be desired, but I am making the best of it, as is.  After all, there is a sense of acceptance in shabby chic style, and the cabin exemplified that.  I was in too much of a hurry to play to take photos throughout this project, but it was easy to do.  I had the scanned ancient photos of the cabin and of Amanda on the computer, and scaled them to fit in between two glass slides from Micheal's craft store.  Making sure that the glass was thoroughly clean, I placed the trimmed photos back-to-back between the glass.  Then, I used copper foil tape (Micheal's) around the outer edges.  It needs to be pressed down smoothly with a burnishing tool to avoid any lifting or seeping of solder into the frame.  Now the fun begins!  I am no solder expert, and encourage anyone interested to search out good videos on the internet to learn this skill.  I fluxed the foil and then applied solder to it's surface until it was coated.  Then, I fumbled, wishing for  a few more hands, until I managed to add the rings to the top and bottom edges.  I will not lie, I ruined the tip of my soldering iron, and had to re-do the piece a few times before it was acceptable.  Now, I am playing with making chain and beads of old buttons, rhinestones, glass beads, and old nylon curtain cord that I had dyed the perfect shade years back.  I love it when I can use old things I have lying about.  I am making the chain of galvanized steel.  It has a tendency to rust, so it's aging will be interesting.  I do plan to coat it with a sealant when the piece is finished.  Not in this photo is an old key from the old cabin that is sitting in some salted ammonia to age it with patina.  This necklace has a  way to go yet, but I will keep y'all posted!
Friday, September 14, 2012

Jacket Updates

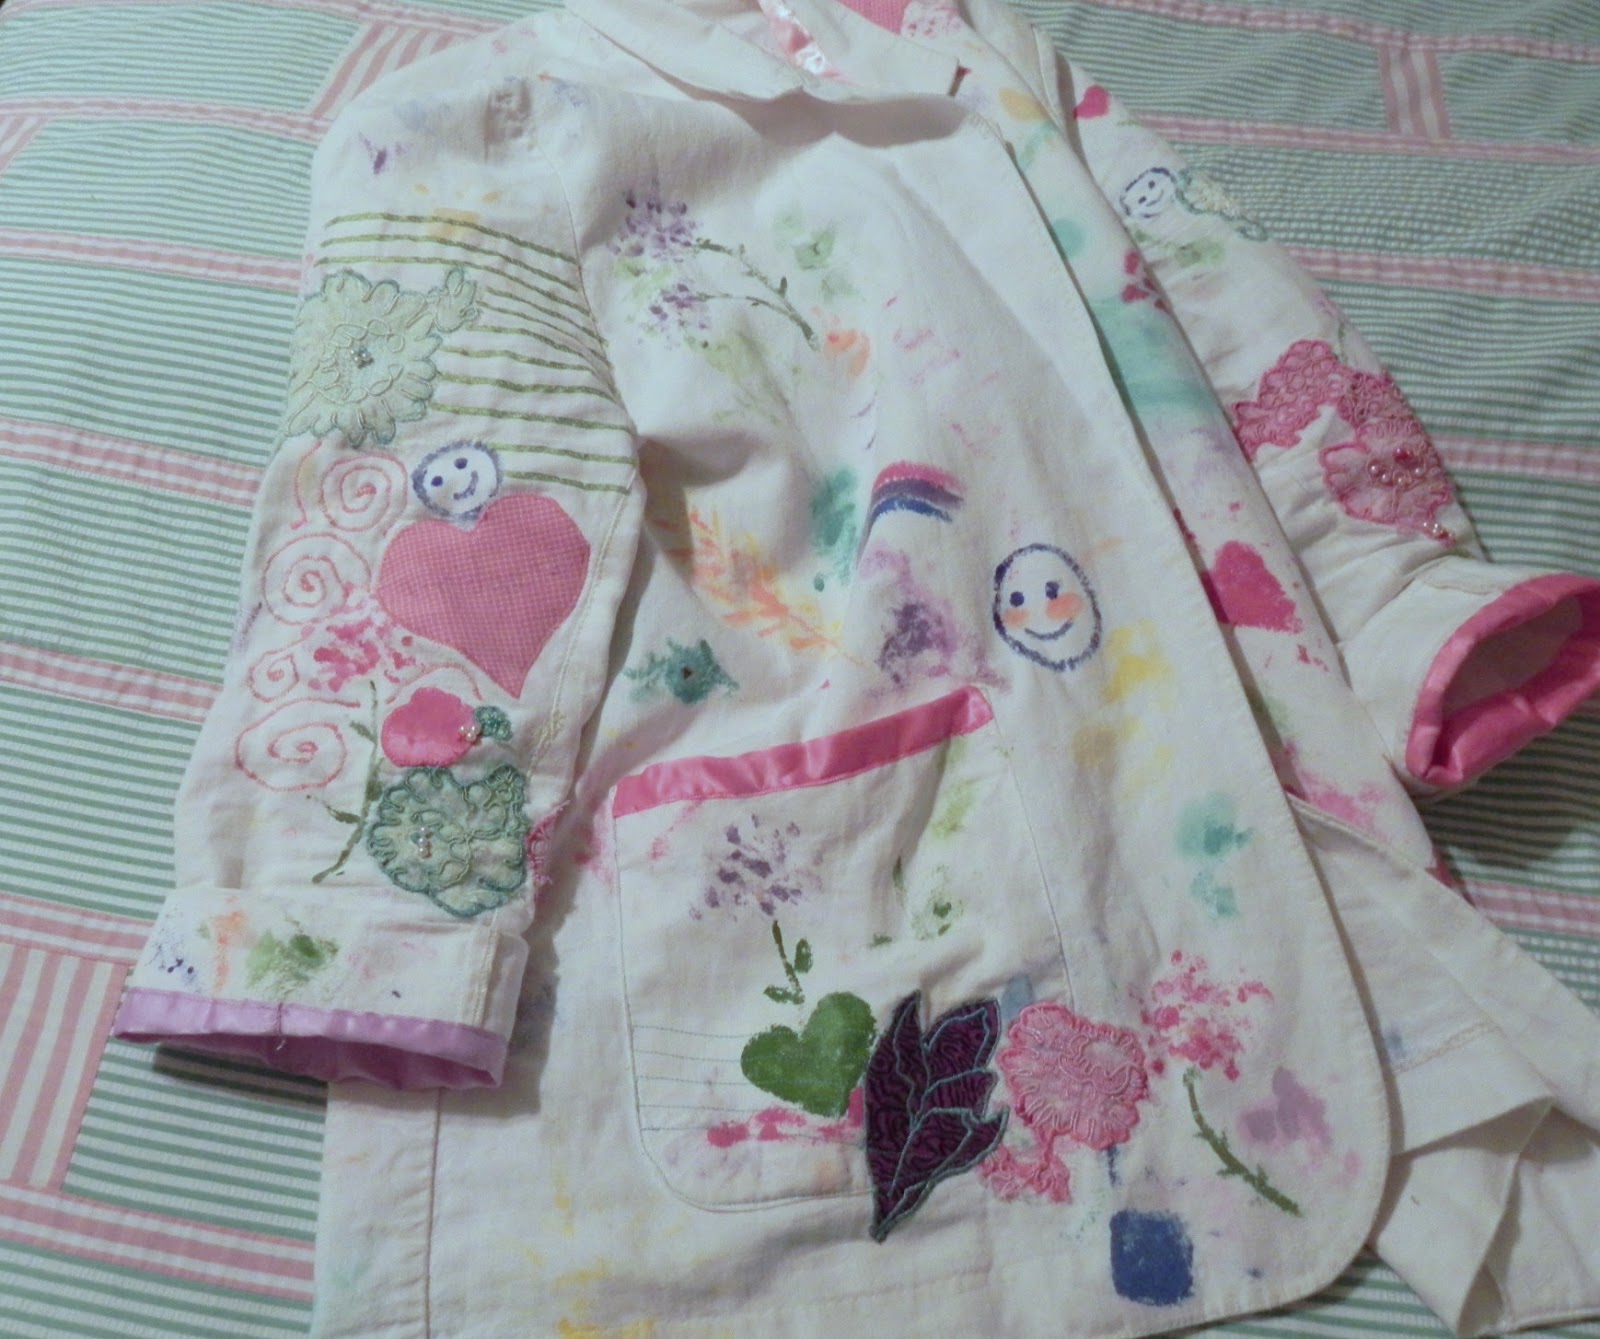
Maybe you get tired of me writing about my 1980's linen Jacket, but I am so attached to this piece of clothing.  Ridiculous almost, but I do love it and wear it often but not so much as I used to.  It has sustained so much wear and now the fabric is giving out in several places.  Last week I blew the elbow out on my right sleeve when I bent my arm.  Big ouch!  It sat miserably ripped while I considered my options:  Should I retire it and use it as a piece of wall art in my studio?  ...or should I keep it going with more repairs?  Well, happily, I decided that wall art is off in the future.  Under intense inspection against a bright light, it was apparent that the entire right sleeve was seriously worn and thin.  Patching and reinforcement was needed to make it wearable.

First I took out the stitching at the back side of the sleeve.  This is a small man's jacket that my sons wore, so the two piece sleeve has two vertical seams.  The one at the back was in better condition than the other, and its integrity was intact while the seam under the arm had a few tiny breaks at the edge of the seam and would require reinforcing.  I left the cuff join alone, starting above the button slit, and opened it up to just below the armhole.  This allowed me to open it up enough to work easily.  I cut a piece of sheeting fabric with a pink striped pattern (in case of future fabric disintegration and show through), pinned it inside the sleeve, and then placed patches over the front inner elbow area where thinning was the worst.  I used a heart shape patch, and plan to embroider my grand-daughter's name on it.  ...Wearing my heart on my sleeve obviously!  The blown out elbow was "stitched" together with lengths of ribbon, looking for all the world like the stitch job one of my sons got in an emergency room by a seriously inept doctor after ripping his thigh on a barb wire fence.   On his leg it was pathetic, on my sleeve it's artsy.  Ah well.  I also used thin ribbon over another patch cut in a circle form wide ribbon In order to strengthen the top part of the sleeve, I striped thin ribbon about 1/2" apart to secure the lining and add stability.  To secure the lining where there were large open areas in design, I drew swirls and over-stitched them, filling in the spaces with spirals like my favorite artist, Gustav Klimt.

The results are stunning it I do say so myself, and now there are plans to "fill in" the rest of the jacket.  ...It sortof looks unfinished now.  But oh how magnificent it will be when I am done! 

Saturday, August 18, 2012

Making Progress Slowly


I absolutely hate housework, but sometimes it just can't be avoided.  At those times, we can all appreciate some helpful advice, and lately I am interested in teh "no effort" kind.  Here is a tip found on a blog a few days ago, that works really well.  I brought some stove pans home from a rental house and they were nasty, let me tell you.  Or rather, I can show you....  
Now, all you need to do is get a ziplock baggie for each pan.  I used gallon size bags.  Add maybe a tablespoon of household ammonia, and zip up.  Let them sit overnight, and voila!  The next day, it only takes a little rub off and they are nearly new looking, and I can't ask for more than that.  Here is the result...


I have also done a few crafty things, but neglected to do the photo documentation because I was running about the house trying to be clever.  It isn't always easy to be creative on a shoestring, and I was determined not to spend a penny on staging accessories for this little house for sale.  The idea was to create a spa feeling in the bathroom.  Candles, French milled soaps, flowers, and bubble bath all seemed to suggest that to me.  This is what I came up with...

Oooh, not the shabby old pitcher, but the wine bottle which now has a label for bubble bath, and the back yard branch transformed with some old paper rose buds.  This may have to grow out of the bottle, and that remains to be seen.  The fine soaps are fraudulent, merely empty boxes made form a template that I found here.  Using colored and patterned paper and a few vintage soap labels, I created a nice assortment of "soaps."  That little basket can sit at the sink.  The box, that is bare discernible, is a small box bottom that was recovered with two pages I printed off the net that had a floral design.  I altered the color and saturation to make them pale, and then dabbed them all over with a used tea bag.  This stained the paper and gave it an aged look.  When the paper was nearly dry, I pasted them to the box with tacky glue.  I had another label that I glued on the side front edge.  Next, I stole some river rocks from the back yard, and filled the box bottom.  I found an old votive holder with a new candle in it, and added that to complete the look.  It will sit on the back edge of the bathtub.  Not bad work for "0" dollars!


Lastly, I had the idea to complete eh kitchen look by making a valance for the window  over the sink.  I got some burlap and some fabric that matched kitchen colors.  I cut 3 rectangles of the burlap and fringed three sides.  I made a stencil of a heart shape and cut the fabric appliques using this.  I quickly zig-zagged the hearts onto the burlap with my sewing machine.  Next, I turned the top edges over a length of twine, leaving the length long enough to swag the top of the window.  That is already hanging...


 ...And thank goodness we are nearly done!


Friday, June 29, 2012

The Chair Swing

For months now, I have been coveting a wonderful chair swing I saw on Pinterest when I first joined.  It stole my heart!  After searching for a good hour, I came across the source as hamanica on Etsy, a company in Nicaragua.  Hand knit by locals, this lovely thing was ridiculously inexpensive, but after shipping costs would probably cost me an arm and a leg.  Anyway, with these being mostly one of a kind, I didn't think I could get the same gorgeous colors and workmanship.  I don't like buying and guessing what I will get.  So, I have finally gotten started on making one for myself.  If I get this one right, I will do it again in these gorgeous greens, purples and blues with the beautiful lacey front border, and even make some incredible pillows to match.

My own attempt is going to be made using some old macrame yarn which I am wrapping with fabric strips.  The yarn is a four-ply cotton, which is strong but soft.  In yet another lifetime, I did a lot of patchwork, so I have lots of small yardages of fabric to do something with.  I have chosen a few of those and have torn them into 1" wide strips.  Each strip gets wrapped around the yarn before I stitch it.  Using #35 gianormous needles, I get 2 stitches to the inch.  It's pretty slow work, but becasue of the size of the needles and lack of stretch, this is a bit hard on the hands.  However, because of the size of the stitches, the fabric builds rapidly.   Thank goodness!  I am just aiming for strong enough to hold and colorful, but I think it will be very cool when finished.  I will keep you posted on my progress! 


Wednesday, May 2, 2012

Giving New Life to the Porch

Just a quickie post to show you a very fast, fun, and funky decor fix for my porch.  I am still waiting for the storm of pine pollen to end to give it a good cleaning and it needs paint this year too.  However, after seeing a few ideas from others, I had the idea to use an old mini-trellis that was almost thrown out to provide a little privacy and beautify the view as well.  The neighbors behind me have recently turned their back yard in a plastic junkyard for their toddler, and I really do not like an unnatural view.  We bought our home 10 years ago becasue of the natural setting, a nearby pond and its wandering ducks and geese, the quiet neighborhood, the birds, and it seemed perfect.  So, to block out the plastic playhouse, two bicycles, 3 plastic push-mobiles, plastic basketball hoop, and plastic sandbox, I grabbed the trellis, slapped some paint (really just using up the paint on the brush, shabby style) and hung it from the braces holding a planter.  I wired on a pin-wheel, a prism, and two wire and glass dangles.  I can change the objects when the whim takes me.  I can use small flower pots or vases, sun-catcher mobiles, small wind chimes, ...really, the ideas are endless.  I have two more of these old trellises, which I plan to use, and more ideas for how to make them fun to come soon.


Sunday, December 4, 2011

Happy New Year!

Now that the New Year is upon us, and in a few days, all the decorations will be packed away until next December, I take more time to renew my connections with what makes Christmas special to me. The tree is full of memories with hand-made decorations hanging generously from all the branches.

Each year, mid-December, as Christmas drew near, my father would take the family out to choose a Christmas tree. We spent hours in the Mid-West snowy cold driving from one tree lot to another in search of the perfect tree. After much consideration, dispute, and anguished selection, we finally made a choice and tied the tree to the roof of the car, and drove our prize home. There it would sit propped up out in the cold, allowing the branches that had been compressed into a flat shape, to adjust into their natural shape. We would occasionally shake the tree and branches to help it untangle and shed dried needles.

One year, as I was going through the preparations, I dis
covered a perfect little nestdeep in it's branches, which I accordingly took it for a sign of good fortune. After all, how many times are we lucky enough to get a tree that had a nest too? And so, in its propitiousness, I have honored that same little nest in a conspicuous place at the front of the tree ever since. Now, many (many) years later, as my glance falls upon it, I am reminded of its origins and the circumstances that surround it. In remembering my father on this New Years Day, I celebrate his loving and creative spirit by sharing with you the miniature birdhouses that he made for me one year. I also honor all those family and friends who helped to create a variety of decorations to include felt snowmen, fabric covered balls, paper snowflakes, clothespin soldiers, and tiny paper doily angels. One year we got my sons involved and made bread dough ornaments of an angel, teddy bear and a even a fisherman holding a huge worm. (Boys will be boys!) When each of them got married, I shared some of these ornaments with them so that they also have memories on the branches.

My very best wishes to you all for a very happy, healthy and prosperous New Year!

Thursday, November 10, 2011

A Very Ugly-Bead Necklace

So, I mentioned a few blogs ago that I was taking a jewelry making course. As usual, I am slow starting to create, especially with the new skills I am learning. I watched all the videos and read the tuts, and did a few wire wrapped bead links, some "S" links, plain wire links, and twisted wire links, and then I did it all over again. I guess I should confess here that my practice results have often been less than successful, and perfection is (strangely enough) not even close. I am usually very judgmental and demand getting as close to perfection as possible. However, I am fascinated and very intrigued by the obvious flaunting of imperfection and breaking the ruling standards that mixed media art has as an outstanding characteristic. So, throwing rules and judgment to the winds of change, I am now creating without any set standards. My cheap and ugly beads that served me to practice with began to assert an unexpected charm and so they are becoming a necklace.
I started with an orphan bead that had no affinity to any other that I had. Why not make it the focal? It is so ugly it is perfect! I ran my wire through it and because it was too loose, I just wound some ribbon yarn around each end in order to help stabilize it. The ribbon did have some connection to some other 30 year old ugly seed beads I had. (Have I ever told you I have a "collecting" problem?) That led me to a thought to attempt to conceal some of its ugliness, and I decided to partially conceal it with a wrap of wire and ugly orange seed beads.
Orange? ...My very least favorite color! Then I threw in a few cheapo ill-formed jade glass beads to keep the orange from being so overwhelming.


Next, I began to add a dangle to the lower end. But why stop at just one? More! More! ...the more the merrier I thought! ...and why not? ...it is a focal! ...there are no more rules! Once satisfied, I simmered and thought about how I could get all my practice parts into this one piece. You know, be done with all the uglies in one fell swoop. So now, I am slowly crawling up the sides with my own very strange "S" links, that were looking so irregular and strange that I began to bend them into crazy out-of-control spirals, which are vaguely reminiscent of those Tree of Life spiral shapes that Gustav Klimt added to his paintings. His inspiration is hard to separate from! ...And do I now see a hint of those same colors from my sweater? I do not as yet have a picture of the growing chain, but will be sure to share with you in my next blog. Till then, be well and happy!

Sunday, December 5, 2010

More Fibula Pins!


I have been having fun this weekend. Creating is always fun. ...Sometimes frustrating, but all the more rewarding in the end. Last weekend, we all went to the Gem & Mineral Show at the fairgrounds. I bought a few beads and geodes, ...not much, but my intention was to dabble. Now, I really wish I had been far more indulgent, as I could make a few of these every day. Each one has its own character, and males me feel (in my own mind anyway) just the teeniest bit akin to great sculptors such a Michelangelo. Yeah, I know that's a stretch, but simply putting oneself into the position of taking a naturally beautiful thing and then attempting to co-create with it is awesome. Here is what I did....

I have already worn the Blue pin with my Jane Thornley Organic Wrap. It held it on and in place perfectly.
PS: I know I am just a beginner

Wednesday, June 30, 2010

Pink Ruffles and Shabby Chic


Several years ago, when I bought a queen bed, I made a duvet cover for my feather comforter, using an abundance of very old green and white cotton seersucker, cut into squares. I purchased a set of pink and white striped twin sheets, which I cut into squares and strips, and sewed them all together. Teaming this duvet with a set of pink sheets and some additional green bordered pillowcases made for a beautiful combination. However, while folding my clean sheets last week, I noticed that my pink pillowcases were becoming frayed along the edges. ...Yes, I must have had my glasses on at that moment, or it would have passed unnoticed. This fraying did not have me tossing them out and making a mental note to go shopping. With lots of wear left in the sheets, I certainly wanted to extend the use of the cases. Here is where not throwing anything away can pay off! Instead, I got out the sewing machine and remnants of fabric and made them new again.

Here is how I did this (Please pardon some of the photos that came out on the dark side)...

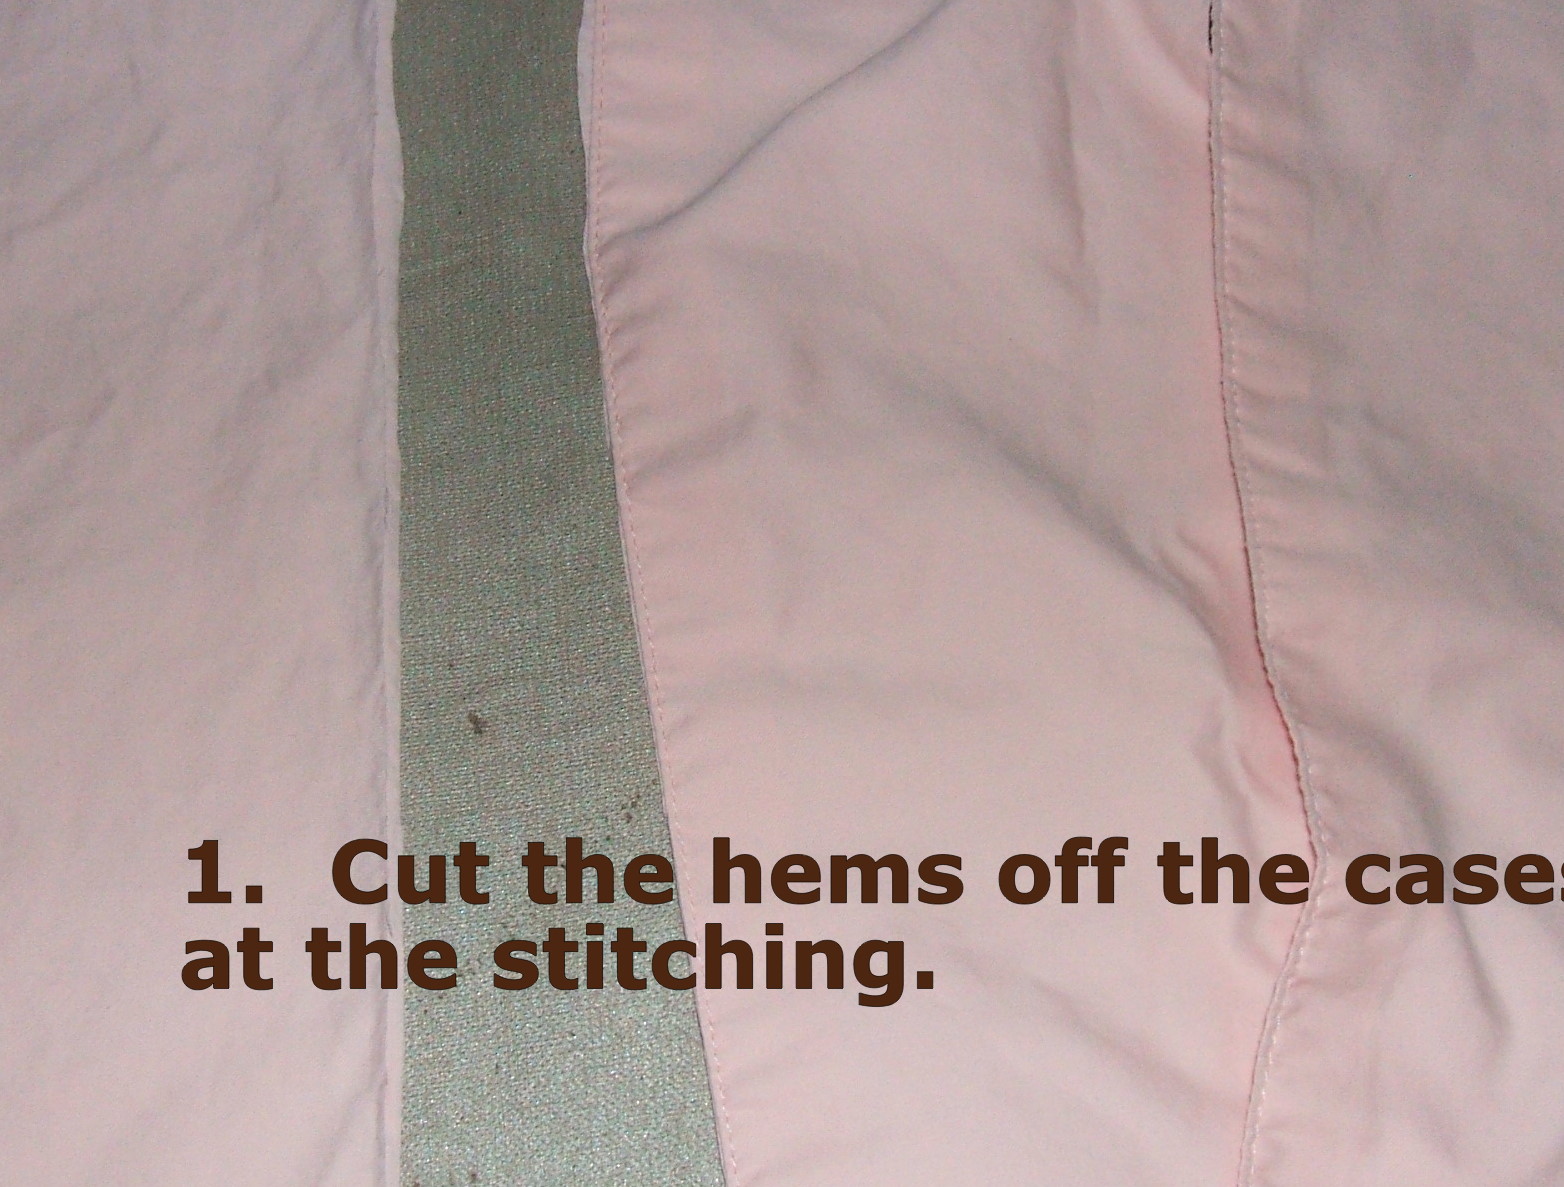
1. Cut the hems off your cases at the stitching.

2. Then, cut a strip of your ruffle fabric that is about 1.5 inches wider than your hem measurement.

A nicely flouncing ruffle is achieved by using the rule of thumb of cutting the strip 1.5 times longer than the edge you are sewing it to. For a very flouncy look, be more generous. Mine follows the rule of thumb.


3. Hem one edge of the ruffle strip, by turning 1/4 inch to the wrong side and pressing it flat. Then, turn it again, so that the raw edge is hidden, and press again.


4. On the opposite edge of your ruffle, run gathering stitches. This is done by sewing with the right side up, and having two rows of stitching, about 1/4 inch from the edge, and again 1/4 inch away from the first row. Gathering stitches will be the longest straight stitch setting on your machine.


5. After you have done the gathering stitches, then mark your ruffle by pinning each end as it lies flat. Then, match up the two pins, and lay it flat again. This will give you another halfway marker, dividing it into quarters.

Mark your pillow case edges in the same way.

6. Now, match up the markers and pin the ruffle to the case. Match the seam of the ruffle to the seam of the pillow case, and make sure that the right side of the ruffle is facing down against the right side of the case. The stitches that are viewable to you will then be gathered up by pulling the same ends of each set of rows, simultaneously, so that they will pull in evenly. Work slowly, and arrange the gathers so that they are evenly distributed between the pins. Be sure that the gathers are not so tight that they are tighter than the case.


7. Finally! Sew your ruffle to the case, with your stitching line just above the 1/2 inch gathering row, using a normal stitch length. This row of stitching is between the two gathering rows. Then, use an overcast or zig-zag stitch to finish the raw edges. Now, you can pull out the gathering stitch row that is outside all the stitching. Trim the thread ends, and turn and press your ruffle seam toward the casing side.

8. The final step! Do a row of edge-stitching, which is simply a row of normal size stitches, that are very close to the seam, or about 1/8 inch away on the casing side. This will hold the seam in place on the inside and keep a crisper look.