Showing posts with label inspiration. Show all posts

Friday, February 5, 2016

K.I.S.S.

Yaaah.  After the holidays were over, I was in severe lag time ...no mojo ...no studio creative juice.  It was awful.  I literally pace the floor when I am in-between creative projects.  If I could walk vertically, I'd certainly be climbing the walls.  My dear husband has learned these signals and patiently observes without comment.  For two weeks I would walk into the studio and diddle with picking up this and that and make no headway at all.  Finally, I decided I had far too many bits and pieces that had been around for ages ...perhaps had been given to me ...maybe I didn't even like them very much ...but kept them around "because."  It occurred to me that in my state of mind, and after so much time off, any piece I might work on was not likely to be something I was pleased with.  In fact, I spent a day trying to solder pieces, etc., and felt like my skills had been slipping.  ...Talk about frustration and despair!  The following morning, I came across a wonderful video by Ira Glass.  I had seen it before, but this video ought to be on the "watch this" list every time I start thinking my artsy creations are crappy.  The man gives a wonderful perspective for beginning creatives at any level.  His message is basically: our taste is better than our skill and it takes lots of practice, but improvement will come, and it may take years to get to our goal ...so be patient and keep on going.


So, with a renewed outlook, I began to do some simple beading , making  stretchy  bracelets with some wood beads I had.  I really enjoyed combining wood with brass beads, and made several. I will be taking them to the boutique to sell, and I hope they all go together.  As a stack they are quite striking in a casual sophisticated way.


 Then, I turned my attention to some unusual wooden beads of grape wood that came together beautifully with a carved animal charm that had fallen off an old necklace, and some less than lovely rhinestone rondelle spacer beads, a few other odds and ends, and it seemed to me that grunge magic happened.  I love this pair of bracelets and want to make a bunch more!


...And because I felt obligated...
I turned out a few Valentine hearts too.


As it turned out, January ended up leaving me feeling as if I had accomplished far more than I expected to and pushed me into February ready to hit the ground running again.

**MORAL OF MY STORY:  When I am challenged with being stuck in a rut, do something simple and just get moving and it will all come back before I know it.


Sunday, March 22, 2015

Shalimar the Muse


The past two weeks you would have found me very busy in the studio.  Diligently working away to get it just the way I want it, it is still only a partially defined idea in my head.  It evolves from day to day just as any creative project does, determined by the process and what I have on hand, and what my feelings are telling me. I try to think something out ahead, then revise and re-think as I go along.  It works for me, but at times it is frustrating because of snags along the way.

Something I decided months ago, was that I needed NEEDED to have a bust to display
jewelry on.   I bought a plastic form at the local flea market for $5!  Can't beat that, but they can be found online for $7 new +shipping.  Originally, the plan was to decoupage old sheet music, floral papers ...??? and use it as a necklace display for photos.  That idea changed drastically when I saw a Pin (sorry, it came and went) that stuck in my head, of an artist's rendition of a goddess.  She had a few strands of curly hair that looked as if they were snatched from a Saint Bernard, and a vintage vamp face with a lace tiara.  I loved that crazy lady and had to try to re-create her for myself.  For a very long time, I have had a Boho/gypsy muse who whispered to me that her name is "Shalimar," a mysterious name that might mean "abode of love" or ...something else.  It is a contrived and decimated Hindi word that apparently would be described as slang in English.   Shalimar dances around a fire of creativity.  In the Chinese Five Elements, Fire represents passion ...having your heart in all you do.  That is exactly what I want for my studio, and I am listening to my muse.


Sunday, March 15, 2015

Let There Be Beautiful Light

This week in the studio, I was working away at one project and in typical ADD/ADHD fashion, another idea sideswiped me to set what I was doing aside and do this...


I did this with 3 feet by 12 inches of organza, about 5 feet of brassy beads, and a sheet of floral paper.  The chandelier chain was about 2 feet long.
  1. Tuck the fabric in at the top of the chandelier, perhaps anchoring it with thread or a tiny wire.
  2. Spiral it around evenly and tuck the bottom edge in.
  3. Wrap the beads from the center, going around snugly twice a the top and then crisscrossing them to the bottom where I used a thin piece of wire to clasp together.
  4. I cut the paper into strips and made tubes that fit around the plastic tubes under the lights
Time:  maybe 30 minutes


Wednesday, March 4, 2015

Mirror, Mirror On the Wall

It has been since the end of last year that I have been working on creating a studio.  Even though it has been painfully slow, I have been sharing the experience with you.  Now, it suddenly seems to be pulling together.  I have a theme and a direction that was missing before this week.  So far, it has been driven by a desire and thinking process, and once I got more focus, I had direction.  Hooray!  What I wanted was:
  • a fun, playful place to create that made me feel happy and creative just to enter the space.
  • an organized and dedicated space
  • a place that symbolized my most positive feelings and nurtured my spirit
  • a place that I would be happy to spend time every day
  • a work area that took care of my creative and physical needs
  • a small, attractive and exciting space for display, to house jewelry that I make for sale so that customers can look easily and soak up atmosphere and feel the goodness
In order to accomplish all this, what I needed to do was some soul searching and a lot of research.  It is not something that can easily be thrown together, and unless an artisan has been at their craft for years, it is not easy to know all that is required.  I have been moving slowly because I wanted to make sure I purchased wisely and set up the space right the first time.  This is especially important for the walls, which newly faux-painted, will have to hold shelves, display pieces, and other invasive equipment.  If I wasn't careful, they would look like Swiss cheese.

One thing I knew I wanted was a mirror. I had an old one that I don't even know from whence it came.  It was a dark and plain wood frame, so I added decoupage.  I wish I had thought to share that process with you, but I get so ahead of myself at times and there is no slowing me down.  The first thing I did was to paint the beveled edge of the frame nearest the mirror with copper metallic paint (cheap from the craft store) and allowed that to dry thoroughly.  Then, I applied leafing adhesive and added gold leaf.  The next step was the decoupage.  I used a wheel cutter to cut straightedge strips from wrapping paper, wide enough to wrap to the back of the frame.  The top of the frame was painted in manageable sections with wood glue. I got that at  Lowes at $4 for a rather large bottle.  The glue was thinned just a little with water with just enough to flow easily but still be tacky and not runny.  I placed the strips at the beveled edge and smoothed them down on the top.  The next day, the process was repeated for the sides and around the edge of the frame to the back.  This two step process allowed the top to dry and have a strong hold to keep the paper from sliding out of position.
Giving the decoupaged surface yet another day to dry, I then covered the entire surface with a coat of Mod Podge.  Just one coat, because I am not a fan of high gloss surfaces.  I want the room to have a cozy up-cycled artsy vintage feel.  Please pardon the reflected junk on the other side of the room, it will be gone soon, as everything shapes up.


Sunday, November 16, 2014

Darn Good Gumbo & We Had a Great Time

It was chilly, and we walked everywhere.
With eyes peeled for beads, I found a few primitive bead strings too.

 I scored lots of interesting focals ... some of them vintage


I also found some great clasps for some multi-strand bracelets, and charms.....


Did I say it was cold?  One might think that Asheville, NC would be a good place to find warmer clothing bits and pieces.  I wanted to find some comfy sweater leggings to go with my new boots, but all I saw were synthetic yukkies.  There seem to be quite a few to select from online, so I will keep fingers crossed. 
(Yes, I am a fiber snob)
We had lunch the first day at Mayfel's  a New Orleans style bistro, and I had the BEST gumbo.  I have to make some now that I am back home.  There is a gumbo recipe that I found in my Grandmother's circa 1900 cookbook that I like a lot, but the DH won't eat okra.  Even though there is not a hint of goo, he has a mental thing about it.  It's darn good gumbo though!  I make mine with chicken and ham (or not), and Mayfel's cooked it up with Anduille sausage in it.  ...They also had beignets.  Oh yeah!  They are a New Orleans delicacy that are very like crispy fried doughnuts, served hot and sprinkled with powdered sugar.   I can't begin to tell you how decadent they are on a cold day with a cuppa hot chicory coffee.  Mayfel's didn't have the chicory coffee, but they did have darn good coffee just the same.

We had a few meals from Katuah, a natural food store's salad table.  Good stuff.  We got some smoked chicken thighs that were so good that the DH is thinking to re-create them here.  Our last day out, we walked around Black Mountain and mid-way through the afternoon we stopped in our fav restaurant and shared a devilishly fudg-i-licious giant slice of chocolate cake and hot tea.  What a warm up that was.
We usually wear ourselves out with walking and sensory overload, and we like to be back at the hotel by late afternoon.  I usually take a portable project.  Remember the BedSack Frock?   It had been stashed away for over a year waiting for the next inspiration.  It has been on my mind ever since I returned from Pennsylvania in September.   I had taken it along and got artsy there with leaves.  I painted fallen oak leaves with fabric paints and pressed them to the fabric.  At the time, I wasn't exactly happy with the result.  Fall colors are not really my piece of cake, and the colors seemed heavy on the muslin canvas.  The next step might have been patching over those leaves.


However, the idea of embroidered water struck days before we left, and so I went armed with blue floss and a trusty needle, and got a lot of embroidery done on the BedSack.  I was stitching the creek.  I like how it's going.  It reminds me of Gustav Klimt with its curls and spirals.  ...Not too much though, cuz its not a raging torrent.  ...Kind of fun to just do whatever with long running stitches and patches of French knots.  The darker blue seems to balance and hold the leaves now, so the plan is to keep them.


One thing I found interesting as we munched on cake and looked out the window of our restaurant, watching the passers by, was that several were carrying newly purchased snow shovels and coasters.  It was beautiful and sunny in the 50's and 60's.  Weather was moving in this week!  It will be below freezing here too.  We have already had snow which is unheard of, and it may be a strange winter.

Tuesday, July 15, 2014

Choices & Facing Demons

I have not been posting for quite a while now.  I have not been creative either.  It seems they go hand in hand.  After the respite, I had to get ready for company.  Now, I hate to admit, but I am a messy artisan.  I get tunnel-vision and tear threw projects like  a tornado and make the biggest messes.  SO, getting ready for company is a "deer-in-the-headlights" moment for me.  Big reality check!!!!  To use another animal phrase, I had the "elephant in the living room" look.  Cleaning up after myself is fraught with decisions and such a bore because there is so much more fun to be had than the drudgery of housework.  However, once I got the living areas of the house looking company ready, I felt so much better about the view, and have determined that I am going to keep them clear and re-organize my everything room into a real studio.  I have been reading a very helpful book by Julie Morgenstern, named Organizing From the Inside Out.  I am such a hopeless case that I have to admit that I started this books years ago and never got beyond the third chapter.  For several years now, I have had a reminder on my bulletin board that "This will be the year that will end my clutter!"  I took it down this January 1 because I didn't want it nagging at me ANY MORE.  Little did I know what was in store for me just a few months ahead.

The thing I like about this author is that her story is just like mine.  She found a way to tackle her problem, and that gives me hope.  I also really really really really really want to have a beautiful clean and ready space to work in and to be able to walk into my studio without twisting and turning around piles and boxes of things that got there from previous quick clears for company visits.

Looking ahead, I have been planning out the new workspace on Pinterest and getting excited about having an optimum place to work with my supplies and tools all at hand with good lighting and and and and and.....

But in the meantime, I am struggling.  I pace the floors because I am not being creative and making jewelry, or sewing items I need, or knitting garments I want , and all those other projects that I have set for myself on Pinterest and that is just a start.  Julie suggests that we start setting up the space as soon as enough clearing will allow because it sets up a feeling of progress and reward.  This would be the solution for me, but I need to clear out the corner of the room, find someplace for all the clutter on the worktable and move a heavy 60" table, that has been used for paperwork, over by the window where it will be a craft table instead.

Anyway, here I am, publicly declaring to be a clutter addict ...resolving to change my ways.  I will post my progress every week until I get there, and be proud to share my new space at that time.  As I go, I will share my plans and dreams with you for my perfect space. 

Friday, April 25, 2014

Epiphany

There's nothing like going through life, passing Middle Ages and getting into the "Senior" category and still you don't really know what you want to be when you grow up.  In my case, I just enjoyed doing so many things that I haven't been able to decide.  So, the other day I made myself one of "those" lists and wrote down all the things I like that could be considered my Artisan ID.   In case you are head-scratching now, that's when you can be exposed to a created piece and know who did it.  Whether it is music or art or a fashion style, you just know who created it.  That's what I have been trying to figure out for months now.  However, even the list didn't help much to clarify my own definition, but the following morning whilst showering, I was hit with one of those thoughts that often come while I am relaxing and letting the hot water pour over me.  Why had I never thought of this in relation to my wardrobe?  My sewing over the decades has really defined me.  I know exactly what styles I like and will wear, and when I applied that same criteria to the jewelry making, my brain lit up like the fireworks on July 4th.  I have been excited about discovering myself ever since!

Inspiration hit me then too.  After looking over my boards on Pinterest for a few hours, I started to get ideas on what I wanted to put together, and here is what happened....  


Wednesday, November 13, 2013

When Does One Equal Three?

XO Gallery bracelet by Kelly Conedera
For some time now, I have been in awe of XO Gallery jewelry artist Kelly Conedera's drop-dead gorgeous creations.  I adore the uniqueness, boldness and freedom of her jewelry designs.  Her use of color and shapes and textures and mixed metals just amazes my beginner's brain.  Although I like my own jewelry babies very much, I am still growing and developing my own style.  I want my jewelry to be more expressive and make a statement.  No run of the mill stuff will ever do for me.  My dear hubby used to buy me fine jewelry for occasions and I was always properly grateful, but they sit on their boxes never seeing the light of day.  ...Or night for that matter.  I get my thrills wearing artsy, rustic, natural pieces that have a personal meaning for me.  Wrap an uncut diamond in a rusty, soldered bezel and hang it from a piece of driftwood and you may turn my head.  I leave those cut and polished gems for the rest of you jewelry lovers!

I have been studying what Kelly's "Jewelry With Soul" has in them that makes them so wonderful in my eyes.  It has always been the case for me that I learn best by observing, and my builder brain will run construction forward and backwards figuring out how to DIY something I want to make.

In this case, I am pushing myself with this project as I am not working within my own comfort zone, but attempting to do this in XO Gallery style.  It forces me to use color more boldly and look at the texture of beads and how they interact in a way I am not used to doing.  These are the techniques I am guiding myself with:
  •  Bold colors
  •  Bold clasps
  •  Dangles near clasp
  •  Mixing metals
  •  Large and small beads used texturally
  •  Seed beads in strands
  •  Large hole beads to hide wire end connections 

 This gave me a new learning challenge that was exhilarating and freeing.  The main beads are colors that I am not used to exploring:  yellow and black.  These yellow beads have been around for years, and I think they were part of a macrame purse that wore out decades ago.   I have thrown in some turquoise and red beads for accent.  Initially thinking of blackened silver metal, the decision was for antiqued and shiny brass instead.  This piece turned out to be a stunning one if I do say so myself.  It was often a struggle and a stretch as each element was tackled.  


 SO, ...to give you the answer to the question, when one equals three could really be turned around to "when does three equal one?"  ...And the answer is a stack-able bracelet set!  It was supposed to be one bracelet yet as work proceeded it made sense to be three instead.  Here is my stack-able creation


*****...And, as an added bonus, I have a finger-saving tip for anyone out there fighting the "flying jump ring" battle.  As a beginner, I am still working with rudimentary tools.  Jump rings are cut with flush cutters and filed into shape so the ends meet.  It is a grueling job and hard on fingertips.  I discovered that if I use a tiny scrap of paper around the jump ring to protect it from gouges, I can use the front oval of the crimp pliers to hold the jump ring while I file away.  Not only does it save my fingers from bruising pain (that happens when you love chain) but it holds very securely and keeps those rings in place.  It even works wonderfully for fidgeting those jump rings into closed position.  
 

Tuesday, October 29, 2013

Pumpkin Waffles in Clouds of Cream Cheese and Fruit

Oooooh this was soooo gooood!

While doing my thing on Pinterest this past Sunday morning, a search turned up this recipe for pumpkin roll pancakes on Holiday Cottage.  My current favorite dessert recipe for the holidays is a pumpkin roll and I was hooked.  I was intrigued by a brief glimpse of chef Anne Burell on the Today show doing up a recipe using pumpkin and ricotta cheese and I had been drooling ever since.  Thing about it is this:  I wanted to make a recipe for waffles instead of pancakes.  I much prefer the crispness and bite of a waffle over a mushy pancake.  Knowing changes would have to be made to the basic recipe, I found this link which was very helpful.

As a rule, I am trying to cut sugar out of the diet.  For years I have been trying to loose a few pounds, and they just haven't gone anywhere.   Recently I was VERY pleased to discover that not having my usual honey in tea or coffee or a sweet snack made all the difference.  Pounds began shedding as if by magic.  After dumping six, I have sort of plateaued, but I guess I might have to work at it to get more off.  Anyway, I did not want to use more sugar for a crispier crust, so I actually reduced that in the recipe.  After all, there is plenty of sweetness in the topping and you could always drizzle this with maple syrup if you have a sweet tooth.  Ricotta didn't make it into the batter, but I did use buttermilk.

Pumpkin Waffles in the Clouds
Ingredients
  1. 1/2 cup all purpose flour
  2. 3/4 cup whole wheat flour
  3. 2 teaspoons baking powder
  4. 1 teaspoon baking soda
  5. 1/2 teaspoon table salt
  6. 1 1/2 teaspoons cinnamon
  7. 1/4 teaspoon nutmeg
  8. 1/2 teaspoon ground cloves
  9. 3/4 teaspoon minced fresh ginger
  10. 2 Tbsp brown sugar
  11. about 1 cup buttermilk
  12. 1 teaspoons vanilla extract
  13. 2 tablespoons  melted butter or safflower oil
  14. 1 egg, separated
  15. 1/2 cup pumpkin puree 
  1. Pancakes. Mix together flours, brown sugar, baking powder, baking soda, salt, cinnamon, nutmeg, cloves and ginger. Make sure to break up any clumps of brown sugar. In a separate bowl, whip the egg white into the soft peak stage.  And in yet another bowl, whisk together buttermilk, vanilla, oil, egg yolk and pumpkin. Combine wet ingredients with dry and gently combine until mixed. Now, gently fold in the egg white mixture.  Do not over-mix.  The batter will be quite thick, but still easily pourable.
  2. Heat your waffle iron to medium-high heat. When hot, use a nonstick spray to coat the grill. Drop 1/3 cup batter onto the grill and cook until the steaming stops and waffles are nicely browned and slightly crispy.
  3. Serve with a dollop of cream cheese topping and a sprinkle of chopped pecans and perhaps a drizzle of maple syrup.
  4. Makes about 6 waffles.

Sauteed Fruit
  1. 2 Green apples diced
  2. Handful of raisins
  3. Handful of dried apricots, chopped
  4. 2 Tbsp butter
  5. 2 Tbsp brown sugar
  6. 1-2 tsp of Cinnamon
Melt butter in frypan over low heat and add apples.  Saute a few minutes until apples begin to soften and then add raisins and apricots and cinnamon. Add sugar and enough water to cover the bottom of the pan and allow it to simmer over low heat and it develops a syrup.  Don't let it get too dry!  This can be used alone for topping waffles of pancakes as a healthier alternative to syrup.

 Cream Cheese Clouds
  1. 4 ounces cream cheese
  2. 2 Tbsp butter
  3. 2 tablespoons powdered sugar (or as needed for consistency)
  4. 2 Tbsp pumpkin puree
  5. 1/2 cup of cold sauteed fruit
 Prepare whipped cream by beating cream cheese, butter and powdered sugar until smooth and creamy.  Fold in the fruit. Cover and refrigerate until ready to use.

Friday, August 23, 2013

BedSack Frock

Yay!  I am making progress on the BedSack painter's style frock that I started a few weeks ago.  I was in a holding pattern for a while due to decisions regarding design.  I was really trying to keep in the neutral color range and colors just kept intruding into my plans.  Here are some photos and a few things I have done so far....


This is the frock with sewing done except for buttonholes.  You can see a little discoloration but this will not be an issue after I do some over-dying.


In this second photo, I show a close-up of the tall skinny pocket I added just for my reading glasses.  I have patched in some fragments of lace trim and leftover quilt scraps to make it a little more fun.


If you iron the shiny side of freezer paper to the back side of the fabric it will adhere and stabilize  so that you can paint of draw or write verse as I have done.  This happens to be a poetic sort of thought I had years back as I gazed out over a small mountain meadow as dusk was settling over the valley.  I thought I had enough room but got too expressive toward the end of the last of it and so it is not so perfect..

"Like bubbles in a glass of champagne, fireflies arose from the tall grasses of the meadow and twinkled away into the dusky twilight."

To complete the thought, I added machine and hand embroidered grass, and some rhinestone sparkles to simulate fireflies.  Here is the hoop I used for both the machine and hand work.  It is essential to keep the fabric taut so the stitches will not pucker the fabric.  There will be more updates as I move along with this garment, but I do not expect to be in a hurry with it.  I think it will be a work in progress for a long time to come.


Wednesday, May 15, 2013

Yes it is May Already!

I have some catching up to do.  Time seems to be escaping me altogether these days.  As I watch my
mother living in slow-motion, I feel as if I have been slowed to her pace and that is so unlike me.  I struggle with wanting to move faster, live faster, experience more and do more, yet I am caught in her web of Alzheimer's dementia.  The house is getting messier and we overlook that.  I will not beat myself up for not being presentation perfect, and I keep my own sanity by being creative when I can.  I tick off the months with my mantle changing.  May has heralded the arrival of many cardinals, and I feel as if I was given a special gift to be able to see there bright red beauty of cheerful crisp songs each day.  I fashioned my pair (and yes I know that I made two males) out of cardboard and pasted some old quilting scraps on and outlined with a Sharpee.  The birdhouse if also cardboard.  It was in my new waffle iron box, and just the perfect size to make into the house.  I fashioned after birdhouses my father used to make.  They were little crooked houses with an off-kilter roof and had crooked chimneys.  Very charming and he loved making them.  I wish I had one now just to place on a shelf somewhere.  My fiber art Earth mother is by an incredible artist friend of mine, Louisa Brown, who used my scraps to made her.  I have a house full of her early painting work, and this is the only sculpture project I bought from her.

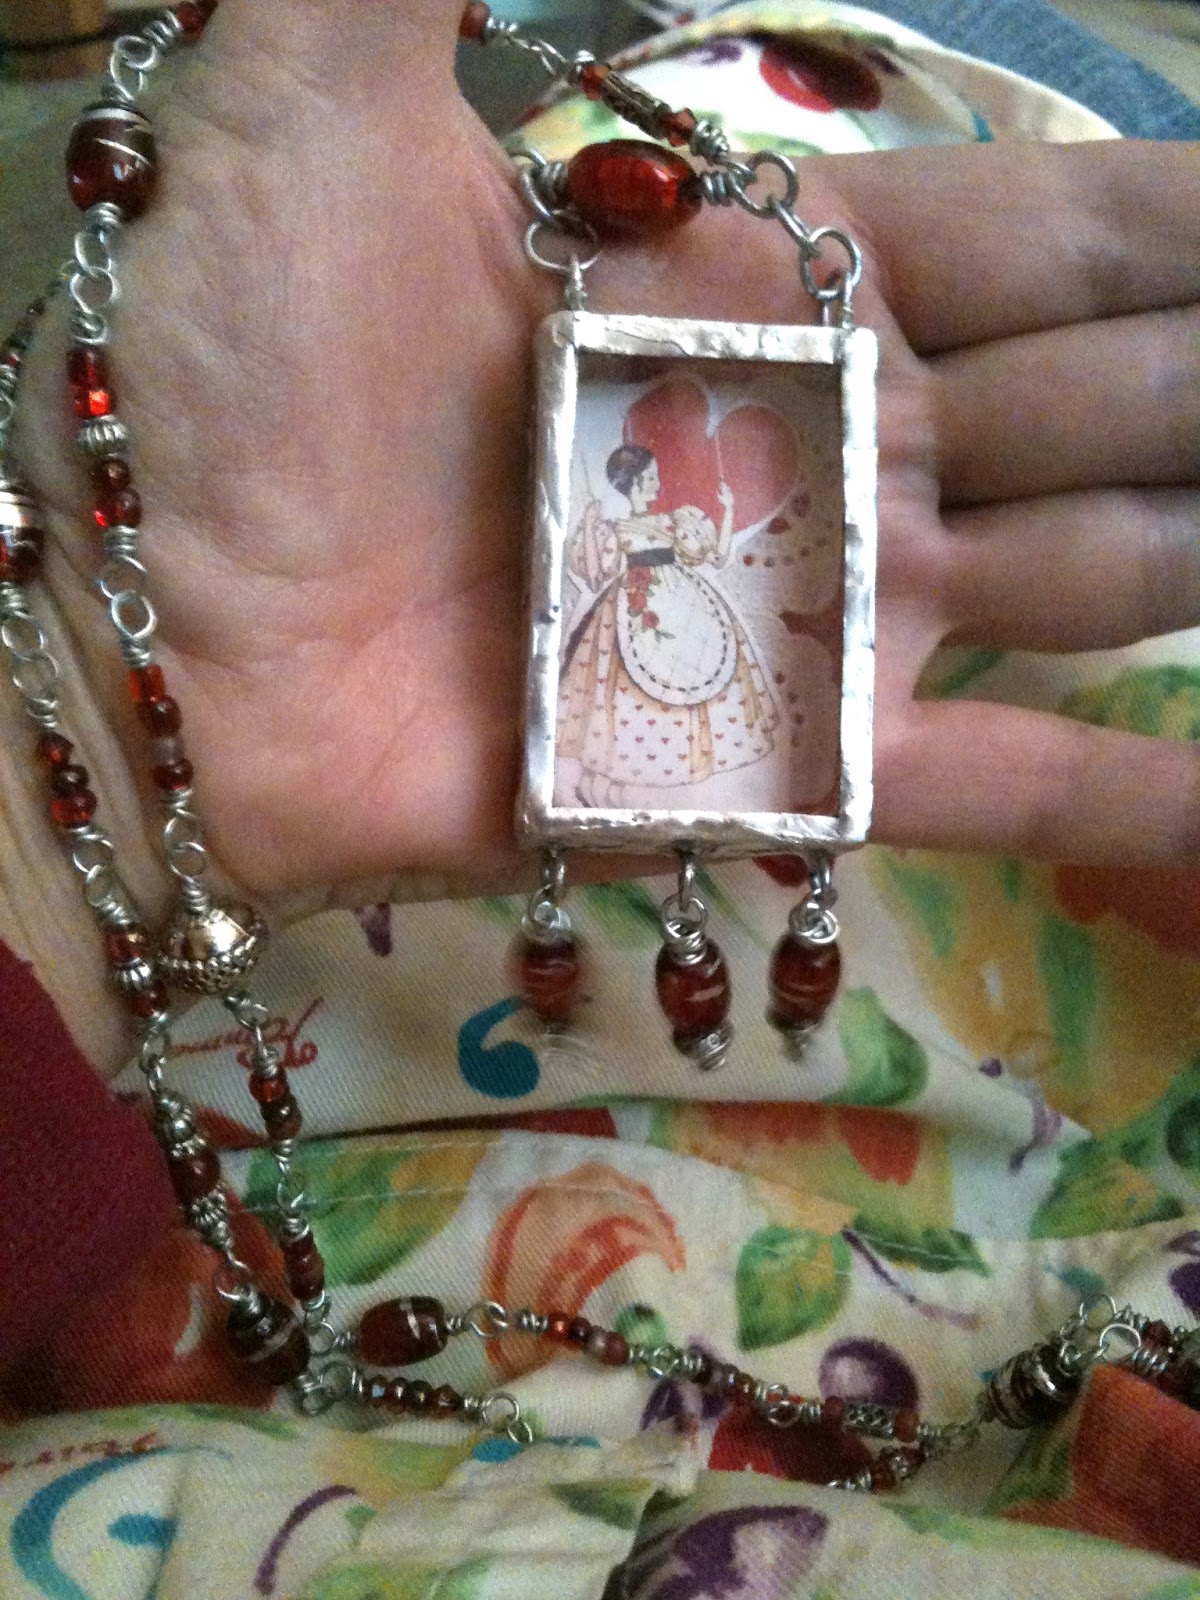
The red necklace is done.  I finished it a few weeks ago, but consider it still unfinished because I want to make a few layers to wear together.  I delayed over decisions for a focal piece.  What finally won out was a design that my sister, Melanie Renn, did for a Valentine greeting card many years ago.  I scanned the card and scaled down the image to fit the matchbox, which is lined with a scrap of red calico and a snippet of paper doily.  The piece came alive at that point.

Ostebro.se
The strawberry tunic is still in the mental planning stages.  Sometimes having something you consider precious is a drawback to moving ahead with re-creating a new life for it.  The fabric is a quilt top that I began when I first learned I was expecting my first child.  I had grand ideas of creating an heirloom baby quilt and traced strawberry designs over nearly all of the yard and a half of fabric.  I was new to embroidery like this, and used ONE strand of floss to do complete cover of the berries and leaves.  It was a far from practical idea, and by the time I delivered, I had only finished two areas and part of another, and I decided that if I kept at it, it might or might not be done for a grandchild.  Since patience is not usually one of my virtues, and I like to complete projects in a timely way, the quilt top got packed away, and surfaced very infrequently over the years.  My son just celebrated his 44th birthday a few days ago, so this has been hibernating a very long time. I fell in love at first sight with this tunic I saw on Pinterest.  It looks as if the floral design was drawn on after the garment was made, and a dash of paint added.  It seems a perfect way to create the old baby quilt top into something I would consider beautiful and useful.  So, I am considering how I will be cutting into the fabric and making the best use of the embroidery.   My thoughts are to do a white tunic over a red petticoat.  ...Maybe throw in some green and embroidered lace trim.  A new challenge arose while I was shopping fabric a few days ago.  The white is not white any longer, it has yellowed a little with age.  Also, most fabrics are now being manufactured in China, and are "crap."  They are sleazy and feel terrible even when they are 100% cotton.  I do not trust the dyes and other chemicals they use at all.  Prices are high for this garbage, and I don't intend to use it!  I will do what I can with my huge stash of real cottons, linens, silks and wools from now on. 


Tuesday, February 19, 2013

Just a Little Cabin in the Woods

Memories...
the old cabin
 Sometimes I get obsessed with an idea that just stews in my brain until I do something about it.  For months now, I have been obsessing about Amanda, the grandmother I never knew.  One of the things she accomplished was to supervise the construction of a cabin built in the "Endless Mountains" in Pennsylvania.  Long ago, Native Americans named the a portion of the Appalachian Mountain chain as the "Endless Mountains."  Building a cabin had been a plan that she shared with my grandfather before he passed on, and in her strength, she saw the plan through so that the family would have a place of respite.  It was a time when people still rallied together to raise a home for a family, and she was fortunate to have "Great Uncle Barney"  to help out. Great Uncle Barney was a builder of barns, and he knew how to put strength into a cabin.  It could have lasted forever.  I say "could" because we lost the cabin several years ago.  A fraudulent contractor, who was hired to put new shingles on the roof, left his old faulty truck to  catch fire and sent the cabin into destruction.  Since then, a new cabin has risen in the old one's place, but the memories and the feeling of the original will be with me always.


My favorite view in all this world ...from the cabin porch swing
I loved nothing better than to sit on the front porch swing and "zone" as I gazed out into the beauty of nature.  It is a bountiful view full of life and sound.  A shallow creek flows by, happily gurgling it's way over rocks as the sunlight sparkles over it.  Damselflies with the deepest iridescent indigo or jade green bodies and lacy black wings dance off it's surface.  Crows add their voices in disrespect of the peace and quiet as they call back and forth, asserting their territory.  Beyond is a field of tall grasses occasionally dotted with scarlet-red bee-balm, delicate white Queen Anne's Lace and daisies.  Across the old dirt road, deer visit an old gnarled apple tree (it's in bloom in the right center of the photo) in the field where I gathered mint, yarrow and other wild herbs.  I would harvest them in the early morning, wash them and then hang them in bunches over the kitchen's old wood-burning stove to dry.

It has been many years now since I was last there.  It used to be an annual two week stay when my mother was living nearby.  Over a decade ago she sold her home and has been living with me, my sister, and now me again.  Her health and my care-giving will not allow for travel.  So, I travel in my mind to this haven of peace and regeneration.

Recently, I took into my head to honor both the cabin and Amanda with a soldered pendant.  My first effort at soldering leaves much to be desired, but I am making the best of it, as is.  After all, there is a sense of acceptance in shabby chic style, and the cabin exemplified that.  I was in too much of a hurry to play to take photos throughout this project, but it was easy to do.  I had the scanned ancient photos of the cabin and of Amanda on the computer, and scaled them to fit in between two glass slides from Micheal's craft store.  Making sure that the glass was thoroughly clean, I placed the trimmed photos back-to-back between the glass.  Then, I used copper foil tape (Micheal's) around the outer edges.  It needs to be pressed down smoothly with a burnishing tool to avoid any lifting or seeping of solder into the frame.  Now the fun begins!  I am no solder expert, and encourage anyone interested to search out good videos on the internet to learn this skill.  I fluxed the foil and then applied solder to it's surface until it was coated.  Then, I fumbled, wishing for  a few more hands, until I managed to add the rings to the top and bottom edges.  I will not lie, I ruined the tip of my soldering iron, and had to re-do the piece a few times before it was acceptable.  Now, I am playing with making chain and beads of old buttons, rhinestones, glass beads, and old nylon curtain cord that I had dyed the perfect shade years back.  I love it when I can use old things I have lying about.  I am making the chain of galvanized steel.  It has a tendency to rust, so it's aging will be interesting.  I do plan to coat it with a sealant when the piece is finished.  Not in this photo is an old key from the old cabin that is sitting in some salted ammonia to age it with patina.  This necklace has a  way to go yet, but I will keep y'all posted!

Friday, September 14, 2012

Jacket Updates

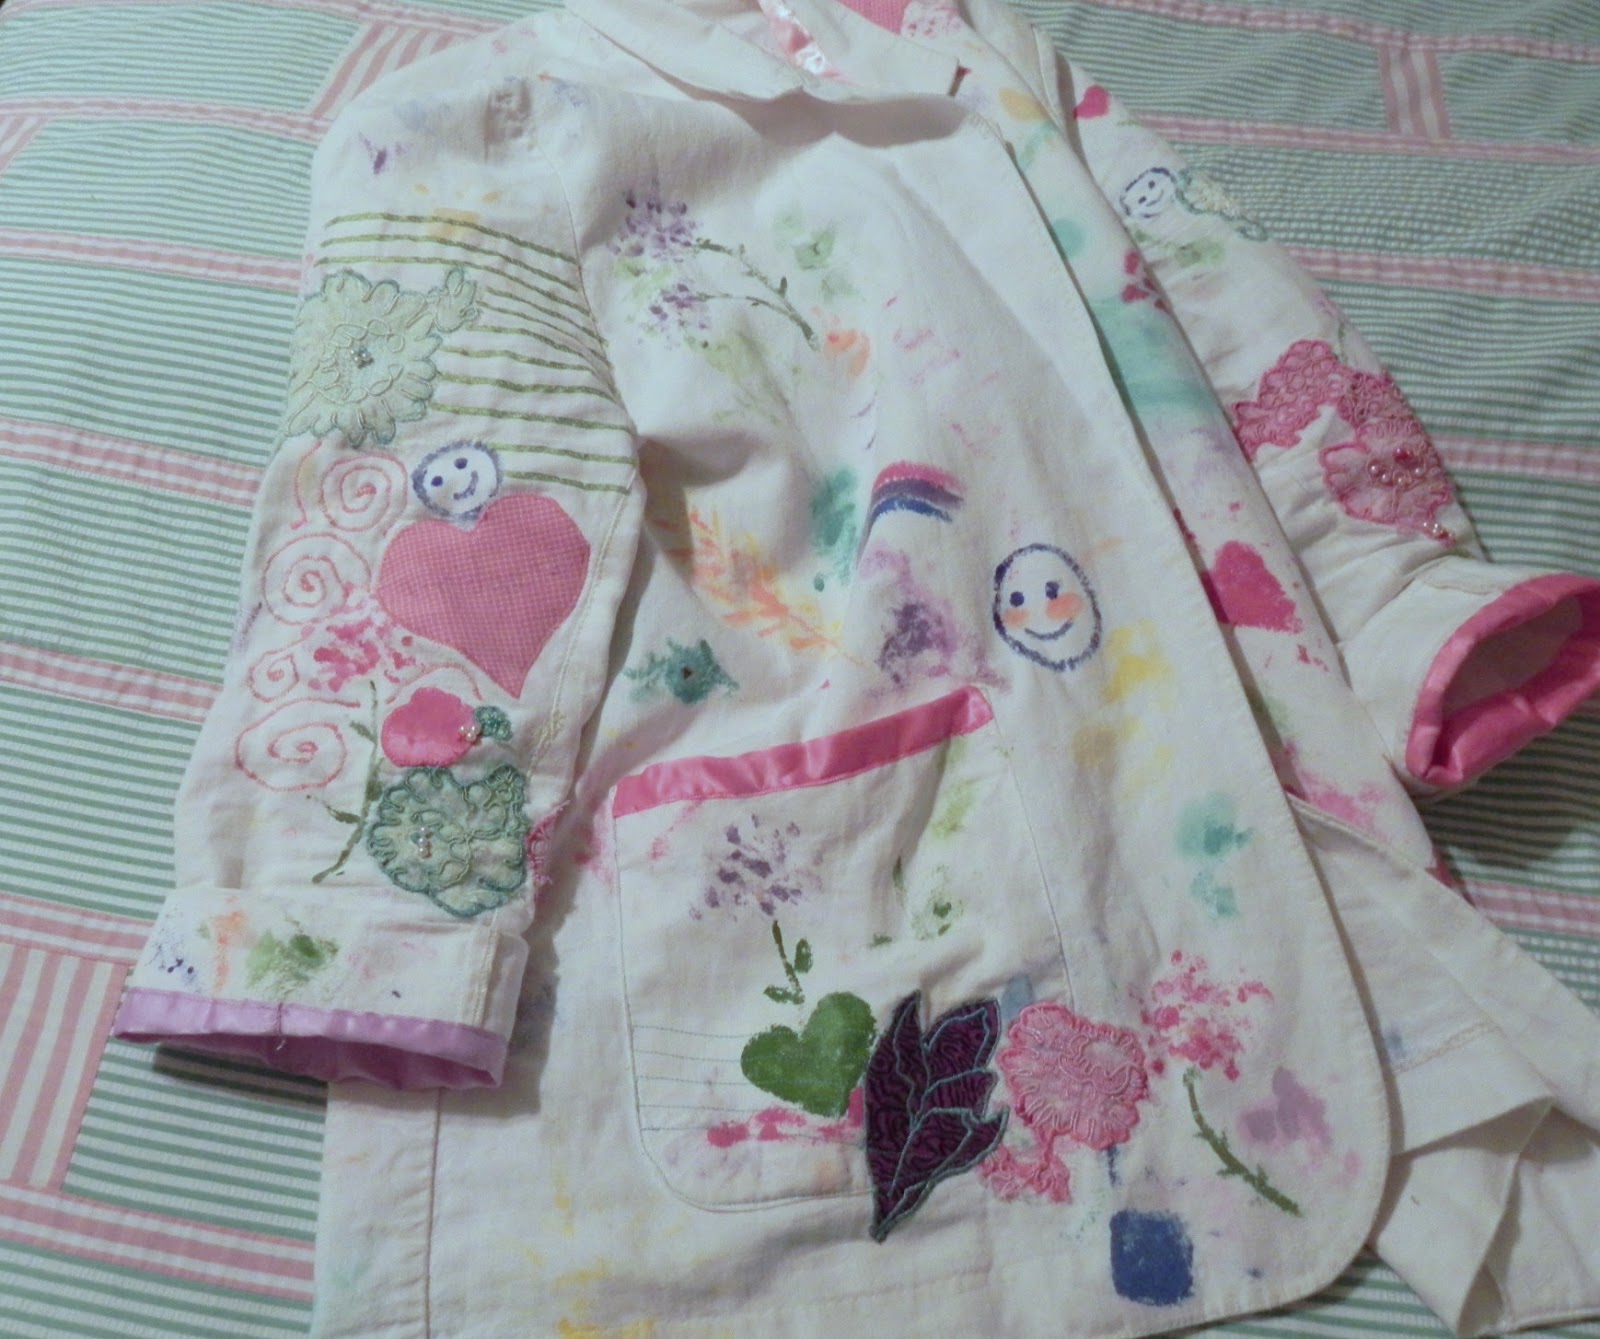
Maybe you get tired of me writing about my 1980's linen Jacket, but I am so attached to this piece of clothing.  Ridiculous almost, but I do love it and wear it often but not so much as I used to.  It has sustained so much wear and now the fabric is giving out in several places.  Last week I blew the elbow out on my right sleeve when I bent my arm.  Big ouch!  It sat miserably ripped while I considered my options:  Should I retire it and use it as a piece of wall art in my studio?  ...or should I keep it going with more repairs?  Well, happily, I decided that wall art is off in the future.  Under intense inspection against a bright light, it was apparent that the entire right sleeve was seriously worn and thin.  Patching and reinforcement was needed to make it wearable.

First I took out the stitching at the back side of the sleeve.  This is a small man's jacket that my sons wore, so the two piece sleeve has two vertical seams.  The one at the back was in better condition than the other, and its integrity was intact while the seam under the arm had a few tiny breaks at the edge of the seam and would require reinforcing.  I left the cuff join alone, starting above the button slit, and opened it up to just below the armhole.  This allowed me to open it up enough to work easily.  I cut a piece of sheeting fabric with a pink striped pattern (in case of future fabric disintegration and show through), pinned it inside the sleeve, and then placed patches over the front inner elbow area where thinning was the worst.  I used a heart shape patch, and plan to embroider my grand-daughter's name on it.  ...Wearing my heart on my sleeve obviously!  The blown out elbow was "stitched" together with lengths of ribbon, looking for all the world like the stitch job one of my sons got in an emergency room by a seriously inept doctor after ripping his thigh on a barb wire fence.   On his leg it was pathetic, on my sleeve it's artsy.  Ah well.  I also used thin ribbon over another patch cut in a circle form wide ribbon In order to strengthen the top part of the sleeve, I striped thin ribbon about 1/2" apart to secure the lining and add stability.  To secure the lining where there were large open areas in design, I drew swirls and over-stitched them, filling in the spaces with spirals like my favorite artist, Gustav Klimt.

The results are stunning it I do say so myself, and now there are plans to "fill in" the rest of the jacket.  ...It sortof looks unfinished now.  But oh how magnificent it will be when I am done! 

Tuesday, May 29, 2012

Knitting Again


Ages have gone by without a knitting project in the making.  I guess this is partly true because of the diversity of my interests, plus the stacks of already knit things, and the fact that the last project took me months to get through.  ...I just needed a break!  So, when I decided that I needed to go through my wardrobe and make some changes, I realized that I have a need for a  few lightweight cover-ups, and a very open knit top would be perfect.  Once again, my mentor and friend, Jane Thornley, tempted me with her new pattern, The Color Streams Wrap, which you can find on Ravelry or her blog.  The plan is to create this as a hem edge, and attach it to a mesh top-down sweater.  Ugh!  ...sweater immediately brings to mind something too warm and covered to wear for summer in the South.

Once again, I am indulging in shades of aqua, teal, turquoise and adding in a really intense electric blue.  The inspiration that juiced me up is an incredible Azurite geode I saw online.  Digging into really old stash this time, I am putting to use some yarn I  bought so many years ago, that I am surprised it is still good.  Forty!  That's how old the yarn is. Anyway, this wrap is made up of short rows, inserting wedges of color that break up the stripy-ness and give a sense of movement.  ...How cool is that?!!!  As I look at this, I think I will back up and remove some of that infinite grayness I am seeing.  I get the feeling that it is killing the spirit of lightness and brightness of this piece and going too dark for summer in the South.  ...I will keep y'all posted on my progress!


Friday, April 20, 2012

Studio Re-Do

Now, with taxes finally out of the way, I can let my brain wander back to creative pursuits and believe me there are plenty of ideas waiting to be born.  For an embarrassingly long time,  I have wanted to clear the clutter from my studio and create a wonderful space for designing and dreaming up new projects.  With so many creative artisans out on the web now, inspiration is often just a click away.  Feeling rather low a few days ago, as Murphy's Law seemed to be preventing me from the simple task of e-filing and printing out my tax forms to mail, I took a break on Pinterest and found a beautiful photo of Tammy Gilley's studio.  Imagine my joy at finding that she has blogged her studio re-do with before and after photos!  I could hardly believe that her studio was nearly as cluttered as mine where just walking through is a serious challenge.

I have decided that I am going to reward myself with my own studio re-do, and share the process with you here over the coming weeks.  With this promise, perhaps I will stay on track and actually finish.  I have begun my re-do with a very simple project to organize my growing stash of beads.  This has been part of a plan for a while now, and a reward to myself for getting through taxes.  I found a huge oil pan, the kind use use under a car that leaks onto the garage floor, for $12.  You can find these in various shapes and sizes, but this was the largest and the least expensive.  Also, and very important is that it HAS to be magnetic.  Take a small magnet shopping with you to test the metal.

Now then, since the pan is galvanized steel, it can be subject to rust.  Because of this, I did not want to screw it directly to the wall.  I had on hand some rubber faucet repair washers, and used them behind the pan to raise it off the wall (glue in place).  I used long screws that I had purchased complete with toggles and drilled a hole in each corner of the pan large enough for the screw to pass through easily.  Before gluing the washers on, I used the pan as a guide to mark the wall where holes needed to be.  After drilling holes large enough to insert the toggles, and getting the toggles hammered into the wall, I then held the pan in place and tightened down the screws.  As you can see, my pan sits right behind the door.  It is a perfect fit, and does not protrude to interfere with the door standing open.  I can easily reach any of the tins here, and the rest of the wall space is open for decor or other storage.

Next, all that was needed was to add the tins to hold the beads.  Since my daughter-in-law had already done a project like this for her spices in the kitchen, she had done the shopping legwork and I knew right where to find the best deal.  Michael's Crafts had them in the bridal favor section of the store in a tub holding 30 tins for about $17.  Since they were on sale when I went in, I bought three of the tubs because I have quite a lot of beads, and the pan will hold all of these and perhaps even more.  My DIL used magnetic tape for her tins, but I was concerned about the weight of the beads, and a quick inquiry with a salesperson confirmed that the tape was not magnetic enough to keep the bead tins from sliding.  So, instead I purchased small round magnets, a pack of 50 was $7.  

Using E6000 glue -in a well ventilated area! I placed a small dab of each magnet and popped it on the center-back of a tin. Patience is the next step.  Gotta give the glue time to set up properly before placing it on the pan or the tin will fall off the magnet.  ...Yah, I am not known for patience.  I had some tins that already held beads, but I highly recommend doing the gluing before filling the tins.  These tins are not very substantial, and will require gentle handling, so filling them before the glue just complicates things a little.

Once the glue is really set though, you are ready to have fun placing and organizing the tins on your pan.  I have not completely filled all mine yet, as I got so excited that I wanted to post this immediately, telling the world about the beginning of my studio re-do.  The plan is to organize them by color and type.  I can't wait to see them all in place, with an at-a-glance view of what is available for my projects.


Sunday, November 13, 2011

The Ugly Bead Necklace Finished


I did it! I got thorough my self-imposed challenge to create something useful out of the ugliest beads I have. There were even some very nice compliments on photos I posted in my Flickr group. One person said it looked like "a party on a chain." ...Love that idea, and as the chain grew, the party got more carefree. It became a friend rather than an opponent. My ugly friend encouraged permissiveness, ...an anything goes approach. After all, there was absolutely nothing to be lost, I was starting at the bottom of the barrel with this. All I was contributing was a little effort, and that was of value in itself because I was getting more practice. .

Starting at the Bottom

As I was creating this piece, I found myself going through an incredible thought process. Every so often, I would question the validity of
spending time on creating something worthwhile with such a sorry-looking batch of components: ugly, misshapen, unmatched, left-over cheap glass beads bought in bulk when I first got interested in beading, and crazy, imperfect forged metal practice pieces I had crafted of copper wire as learned in the BuildZone jewelry making course.


The Process

As the necklace grew, it took me through some interesting thoughts. Beginning with a lot of self-doubts (those Gremlins I blogged about a few posts back), I was not at all sure of why I took this challenge on. Why would anyone in their right mind start creating with a bunch of stuff that seemed to say "just put me in the trash!" Isn't is much nicer to think about having gorgeous materials and what the end result of silver and gemstones could be? What was driving me? ...stubbornness? ...a sense of frugality? ...a "way out" excuse for defeat? I am really not sure.

Yet the ugly bead necklace grew, and as it grew, I felt a sense of acceptance. It allowed me to free myself of any constraints that might have held me back. I gave myself over to the spirit of freedom, and creative energy flowed through my braincells and into my fingertips. I ceased to think so much and just did what felt right with each added link. It didn't have to be anything but ugly, and yet with each link I started to like it more and more. A strange sort of beauty was unfolding in my hands and although I knew each imperfection well, I felt like I was forging a life. Out of ugliness and pain came joy and freedom, and a thing of carefree beauty. It doesn't matter if it is of the basest materials because it has a spirit of the highest nature. Maybe it has a "face" that only a mother can love, but this is one child I love to look at.

The Sweet Finish

I may add a few more ribbon tails, and a random dangle here and there, but this child is birthed. As I look at this piece, I am thinking many thoughts so different than those that weighed me down at the start. It reminds me that beauty is only skin deep, but also that just because something isn't always beautiful by most standards, doesn't mean that it has no beauty or value in and of itself. It reminds me that beauty can be found wherever we look for it, and that we should do what we love never separating ourselves from the Creator within. In all things there is purpose, and that our intent and openness can lead us to a beauty that we are not always aware of. I feel a real sense of serenity in that.


May you find beauty and serenity in your day.

Thursday, November 10, 2011

A Very Ugly-Bead Necklace

So, I mentioned a few blogs ago that I was taking a jewelry making course. As usual, I am slow starting to create, especially with the new skills I am learning. I watched all the videos and read the tuts, and did a few wire wrapped bead links, some "S" links, plain wire links, and twisted wire links, and then I did it all over again. I guess I should confess here that my practice results have often been less than successful, and perfection is (strangely enough) not even close. I am usually very judgmental and demand getting as close to perfection as possible. However, I am fascinated and very intrigued by the obvious flaunting of imperfection and breaking the ruling standards that mixed media art has as an outstanding characteristic. So, throwing rules and judgment to the winds of change, I am now creating without any set standards. My cheap and ugly beads that served me to practice with began to assert an unexpected charm and so they are becoming a necklace.
I started with an orphan bead that had no affinity to any other that I had. Why not make it the focal? It is so ugly it is perfect! I ran my wire through it and because it was too loose, I just wound some ribbon yarn around each end in order to help stabilize it. The ribbon did have some connection to some other 30 year old ugly seed beads I had. (Have I ever told you I have a "collecting" problem?) That led me to a thought to attempt to conceal some of its ugliness, and I decided to partially conceal it with a wrap of wire and ugly orange seed beads.
Orange? ...My very least favorite color! Then I threw in a few cheapo ill-formed jade glass beads to keep the orange from being so overwhelming.


Next, I began to add a dangle to the lower end. But why stop at just one? More! More! ...the more the merrier I thought! ...and why not? ...it is a focal! ...there are no more rules! Once satisfied, I simmered and thought about how I could get all my practice parts into this one piece. You know, be done with all the uglies in one fell swoop. So now, I am slowly crawling up the sides with my own very strange "S" links, that were looking so irregular and strange that I began to bend them into crazy out-of-control spirals, which are vaguely reminiscent of those Tree of Life spiral shapes that Gustav Klimt added to his paintings. His inspiration is hard to separate from! ...And do I now see a hint of those same colors from my sweater? I do not as yet have a picture of the growing chain, but will be sure to share with you in my next blog. Till then, be well and happy!

Tuesday, October 18, 2011

The Klimt Limps On

Yes, ...limps. It feels that way anyway, I am naturally an impetuous and impatient person, and this project has been going on for months! Even though I can see the end in sight now, it still feels like it's dragging its feet! I have been thinking and planning for some design in the sleeves, but the little voice in my head is now saying K.I.S.S and lighten up. I think I will listen. Life has been throwing its challenges my way, and there have been too many interruptions. How in the world do other people keep a train of focus when one thing after another causes an interruption? ....Have I mentioned there was yet another kitchen ceiling leak? Yup, ...that too! Now there is a new hole in the brand new ceiling to be repaired, and I can't remember what paint I used this past spring, or even if I have any left over. Sigh. Maybe I will just paint a design up there, or a sign that says "ouch" or "c'est la vie."


Oh but back to the Klimt.
I hope to b
e finished in less than a week!

Wednesday, July 6, 2011

The Cobweb That Caught the Sky


COBWEB: A flimsy, insubstantial snare spun by a special breed of spider to entrap its prey

After weeks of repair and remodel, I needed an outlet for a gentler creative side of me. Picking up knitting needles once again after months of neglect, I vowed that I would just simply let them and the yarn take me to places I have never ventured before. I did have in mind something sort of Rodarte, who I have venerated ever since the sister's 2008 lines came out. Based on nature and totally radical knits, they represented for me a no-rules way of creating something out of nothing more than an idea. Characterized by loosely knit webs of fine mohair capturing bold areas of color and heavily textured, they have captured my spirit, which has always been a voice in the background begging me to give it a try.

The yarns seemed to just fall into my hands. Even though I had planned for another use of a wild diva that looks like bits of wool tied to hologram metallic thread and nylon cord scraps, it called to be a companion to the more sedate natural tan silk fingering weight that I have been hoarding from Artfibers for years now. Artfibers has the most gorgeous stuff I have ever seen in one place. All their yarns are spun to order. Amazing, yarn heaven, and it is worth a visit if you are ever in the San Francisco area. Then, a painted pastel nylon ribbon that had insisted on coming home with the diva (for some reason), entered the mix. And that was it. Just three yarns, ...quite a change of habit for me since I am usually working with anywhere from six to ten in any one project.

After trying several large needle sizes on the fingering weight yarn, I settled on a #13. At that point, I just began by casting on three stitches. The only thoughts for an end result were perhaps to make a cropped vest to go over summer tops for a little cover. From then on, all I kept in mind were basic rectangular shapes that roughly met my measurements. Free of regard for any sort of edge consistency, I simply knit until the pieces were relatively the same length. Individual stitches were another form of abandon. I threw in short rows, drop stitches, and varied knits and pearls to add more irregularity, and jigged and jogged the hems and edges. The yarns were picked up and dropped at will, creating shapes that drift like clouds of diva yarn and held by patches of ribbon that look like the sky. Yarn tails fly free like the tails of kites.

Once the pieces were of a relatively matched length, I cast off the back and fronts, and joined the shoulders as well as at the sides. To give a bit more shape and weight for a nice drape, I crocheted a single row of chain stitches to the edges with the ribbon yarn, and added a tie of the combined yarns braided together at the front.

I have written up a downloadable pattern/guide for those of you special spider types, who want to give this a try with more guidance than I have given here. You can find it on Ravelry as the Cobweb Vest, or my Etsy store, or by simply emailing me a message.