Showing posts with label beads. Show all posts

Sunday, May 1, 2016

Process

When it comes to describing my creative process, I can only say that I start with an intention and perhaps a picture or a sketch.  From there on, anything can happen.  At times I find it so terribly frustrating, and I wonder how many other artisans find this to be true for them also.  ...Sometimes, I get so far off course that I end up with a piece that is nothing like what I had conceived in the first place.  ...Sometimes, there has been an issue with the materials or the design, but often it is simply that the design takes on a life of it's own and leads me on a totally divergent course.

The talisman to the right that I completed, was to have been a single strand necklace.  I prefer the idea of layering strands instead of a single layered-look necklace.  However, as I went along, I found that the raw garnet beads were getting quite heavy, and so a shorter strand was called for.  Then, the look wasn't quite right, and other strands were added to give the design more weight and importance.  I also decided that the frame for the crystal and charms seemed too long and it was a choice between scrapping this one and making a shorter one or altering how it looked somehow.  I am groaning just thinking about it!  ...And I added another strand.


Friday, February 5, 2016

K.I.S.S.

Yaaah.  After the holidays were over, I was in severe lag time ...no mojo ...no studio creative juice.  It was awful.  I literally pace the floor when I am in-between creative projects.  If I could walk vertically, I'd certainly be climbing the walls.  My dear husband has learned these signals and patiently observes without comment.  For two weeks I would walk into the studio and diddle with picking up this and that and make no headway at all.  Finally, I decided I had far too many bits and pieces that had been around for ages ...perhaps had been given to me ...maybe I didn't even like them very much ...but kept them around "because."  It occurred to me that in my state of mind, and after so much time off, any piece I might work on was not likely to be something I was pleased with.  In fact, I spent a day trying to solder pieces, etc., and felt like my skills had been slipping.  ...Talk about frustration and despair!  The following morning, I came across a wonderful video by Ira Glass.  I had seen it before, but this video ought to be on the "watch this" list every time I start thinking my artsy creations are crappy.  The man gives a wonderful perspective for beginning creatives at any level.  His message is basically: our taste is better than our skill and it takes lots of practice, but improvement will come, and it may take years to get to our goal ...so be patient and keep on going.


So, with a renewed outlook, I began to do some simple beading , making  stretchy  bracelets with some wood beads I had.  I really enjoyed combining wood with brass beads, and made several. I will be taking them to the boutique to sell, and I hope they all go together.  As a stack they are quite striking in a casual sophisticated way.


 Then, I turned my attention to some unusual wooden beads of grape wood that came together beautifully with a carved animal charm that had fallen off an old necklace, and some less than lovely rhinestone rondelle spacer beads, a few other odds and ends, and it seemed to me that grunge magic happened.  I love this pair of bracelets and want to make a bunch more!


...And because I felt obligated...
I turned out a few Valentine hearts too.


As it turned out, January ended up leaving me feeling as if I had accomplished far more than I expected to and pushed me into February ready to hit the ground running again.

**MORAL OF MY STORY:  When I am challenged with being stuck in a rut, do something simple and just get moving and it will all come back before I know it.


Thursday, April 2, 2015

Spring Fever

Hyacinths, daffodils, forsythia, yellow jessamine, honeysuckle, and now the azaleas are all bursting into bloom.  It means our short Spring has arrived.  For the next two weeks, warmer temperatures and that longing to throw windows and doors open has to be ignored.  All the flowers and pine trees are filling the air with clouds of fine yellow pollen that piles up
everywhere, and makes my nose itch and sneeze and I have to bathe my burning eyes several times a day.

Going out is risky business, so now that I am stuck indoors, and sorta-kinda done with taxes, I took a break and got creative today.  Out came strings of turquoise beads and silvered chains and wire and anything that looked remotely good with turquoise.  I didn't get any serious tools or torches out today and just enjoyed the ease of beading.  This is a long necklace with dyed howlite or magnesite beads, carved turquoise beads, old "silver" trade beads, a sterling Hamsa hand, and a tiny Tibetan prayer box charm.  The tassel is hand-dyed silk.

This next necklace also has turquoise nuggets, tiny carved bone beads and dragon, and antique bronze metal with a hand-dyed silk cord and tassel.  I squeezed that in about three weeks ago.


Wednesday, August 20, 2014

I Feel Like the 60's

Beading and macrame were passions in the 60's and 70's.  I even got the hubby of the moment to get
into the macrame and he helped with larger projects.  I remember hanging rope from a patio arbor to make plant hangers and wall hangings.  I was doing the free-range thing way back then with combining various cords and yarns for texture.  I did many little projects with crochet cord for jewelry as in the bracelet to the right.  It's all that remain of those days.  We didn't have much money, and hippy crafts were cheap.  I loved beads, but hated rat tail cord that always broke during wear and left me scrambling up beads from their scattered landing spots.  I gave it all up until I was a Cub Scout den mommie and my cubbies did some beaded key "chains" to satisfy the Indian badge. It was a brief resurgance and then years later, I had a wonderful Union Bay denim man shirt that I wore the poo out of.  At some point, I got out a shoe box and did some bead work for the shoulder seams.  About 2 years ago I upcycled that shredded shirt into small shoulder bags.  I tried to sell them on Etsy, but Etsy has never been golden for me.

gorgeous wrap bracelet found on Pinterest


This week has seen me returning to beading.  I am drooling over a gorgeous wrap bracelet I found through Pinterest and tangent searches.  After pinning it, it has been climbing in popularity, and I have wanted to make my own version.  The hammer and torch-ering metal is on hold for a while as my right side is sore from neck muscles down to the right hand fingertips due to what I jokingly refer to as "man-handling" (lifting and moving) during care-giving activities. Repetitive stress injury can be devastating and I want my body to heal and take it easy while this level of care continues.  I have moved the bed position so that I am using my left side more, and trying to be more mindful as I lift and move her in the bed.  Now that she has been bed-ridden for nine months, I am simply forced to take better care of myself.


So, this is my little project.  ...Just getting started, and I plan to add some leather and wrapped cord too.  


Tuesday, April 1, 2014

Spring is here!

With every end of the month I take inventory and ask myself what I most want to accomplish before the next month sets in.  It's about completion and feeling good about myself.  March winds seemed to blow hard on us symbolically here and brought chaos and changes that were not expected.  Even though last weeks Bad Business was a nightmare, it held within it the opportunity to spend longer moments with my passion.  Interrupted too often with endless aggravations, concentrating on taxes was out of the question.  So, I worked on jewelry.  Not only did it keep me calmer and more in control, but it was possible to finish a piece I began several weeks ago.  
I have been lusting over the idea of a lime green bracelet for ages and this little birdie sang an inspirational song to me.  I can hardly believe that I created this piece because it is so very different from anything I have ever done to date.  I used new skills that I picked up in Stephanie LeBaron Lee's Homesteaders Metalsmithing e-course.  There was such a wealth of information in it that I have barely touched the surface yet.  Just get me through taxes and will I ever have fun!!!


Wednesday, May 15, 2013

Yes it is May Already!

I have some catching up to do.  Time seems to be escaping me altogether these days.  As I watch my
mother living in slow-motion, I feel as if I have been slowed to her pace and that is so unlike me.  I struggle with wanting to move faster, live faster, experience more and do more, yet I am caught in her web of Alzheimer's dementia.  The house is getting messier and we overlook that.  I will not beat myself up for not being presentation perfect, and I keep my own sanity by being creative when I can.  I tick off the months with my mantle changing.  May has heralded the arrival of many cardinals, and I feel as if I was given a special gift to be able to see there bright red beauty of cheerful crisp songs each day.  I fashioned my pair (and yes I know that I made two males) out of cardboard and pasted some old quilting scraps on and outlined with a Sharpee.  The birdhouse if also cardboard.  It was in my new waffle iron box, and just the perfect size to make into the house.  I fashioned after birdhouses my father used to make.  They were little crooked houses with an off-kilter roof and had crooked chimneys.  Very charming and he loved making them.  I wish I had one now just to place on a shelf somewhere.  My fiber art Earth mother is by an incredible artist friend of mine, Louisa Brown, who used my scraps to made her.  I have a house full of her early painting work, and this is the only sculpture project I bought from her.

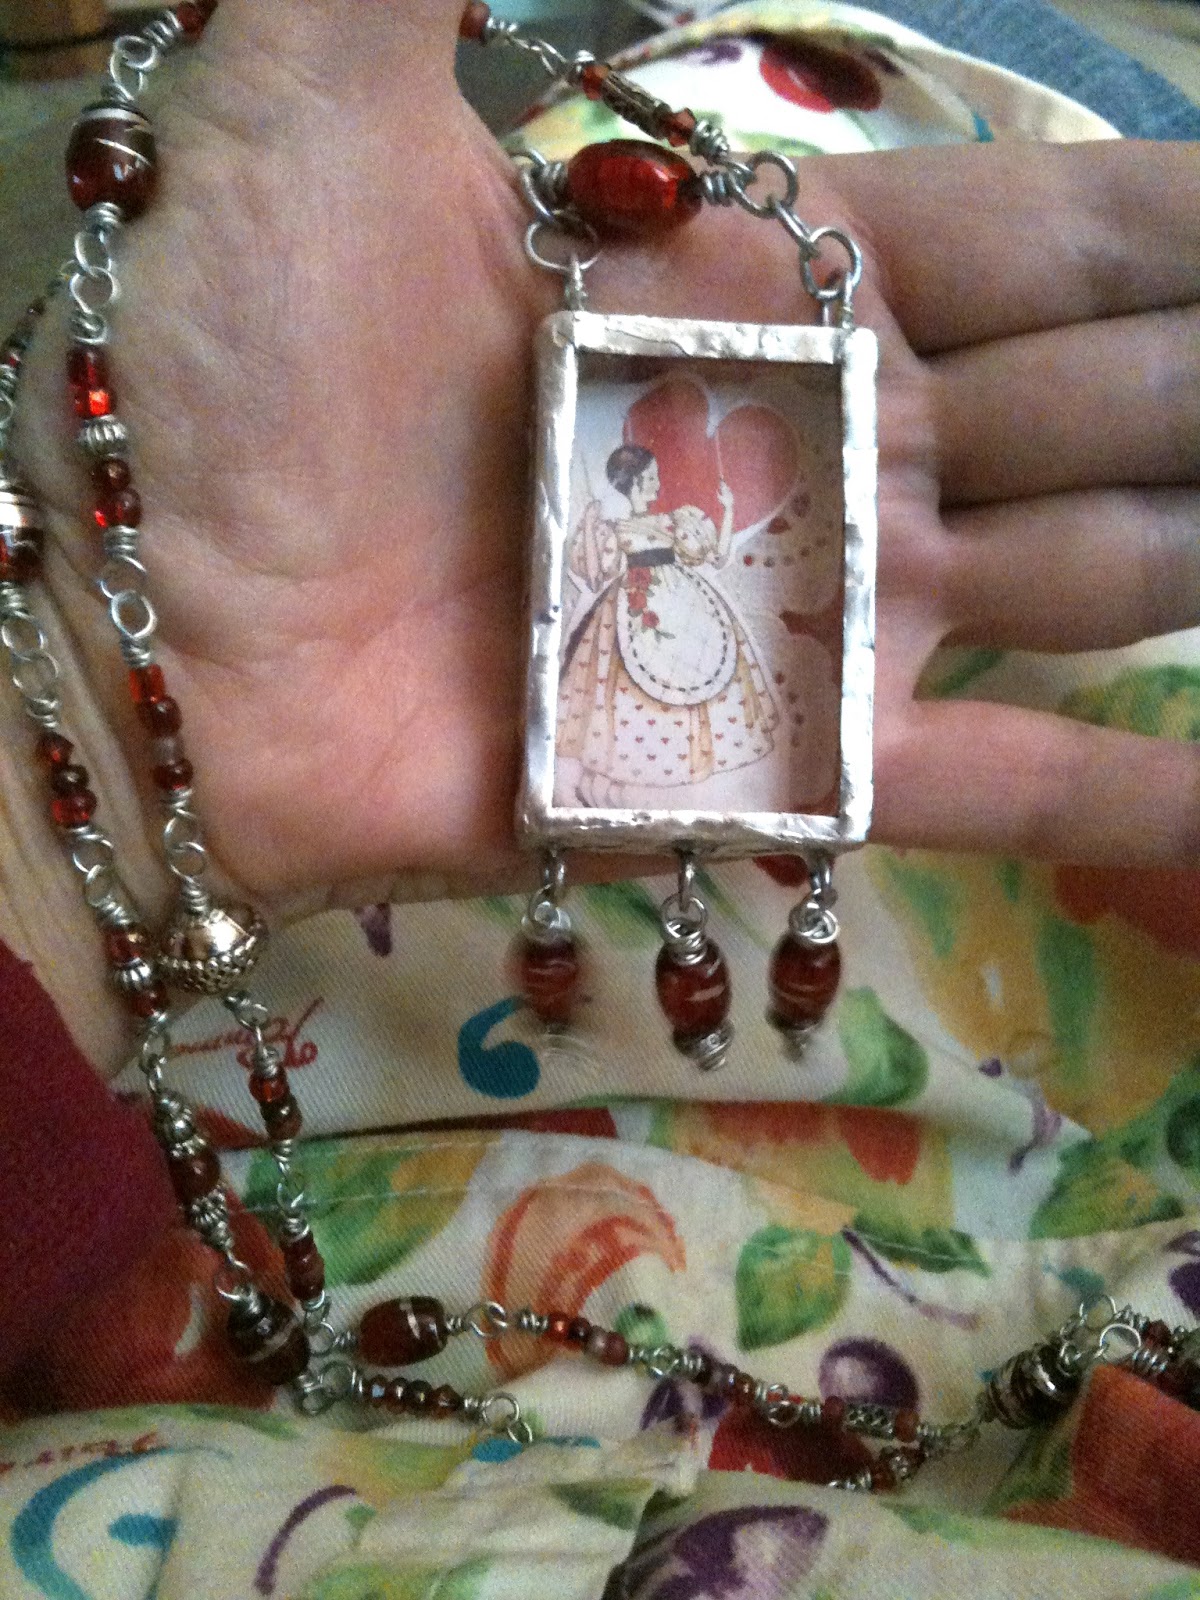
The red necklace is done.  I finished it a few weeks ago, but consider it still unfinished because I want to make a few layers to wear together.  I delayed over decisions for a focal piece.  What finally won out was a design that my sister, Melanie Renn, did for a Valentine greeting card many years ago.  I scanned the card and scaled down the image to fit the matchbox, which is lined with a scrap of red calico and a snippet of paper doily.  The piece came alive at that point.

Ostebro.se
The strawberry tunic is still in the mental planning stages.  Sometimes having something you consider precious is a drawback to moving ahead with re-creating a new life for it.  The fabric is a quilt top that I began when I first learned I was expecting my first child.  I had grand ideas of creating an heirloom baby quilt and traced strawberry designs over nearly all of the yard and a half of fabric.  I was new to embroidery like this, and used ONE strand of floss to do complete cover of the berries and leaves.  It was a far from practical idea, and by the time I delivered, I had only finished two areas and part of another, and I decided that if I kept at it, it might or might not be done for a grandchild.  Since patience is not usually one of my virtues, and I like to complete projects in a timely way, the quilt top got packed away, and surfaced very infrequently over the years.  My son just celebrated his 44th birthday a few days ago, so this has been hibernating a very long time. I fell in love at first sight with this tunic I saw on Pinterest.  It looks as if the floral design was drawn on after the garment was made, and a dash of paint added.  It seems a perfect way to create the old baby quilt top into something I would consider beautiful and useful.  So, I am considering how I will be cutting into the fabric and making the best use of the embroidery.   My thoughts are to do a white tunic over a red petticoat.  ...Maybe throw in some green and embroidered lace trim.  A new challenge arose while I was shopping fabric a few days ago.  The white is not white any longer, it has yellowed a little with age.  Also, most fabrics are now being manufactured in China, and are "crap."  They are sleazy and feel terrible even when they are 100% cotton.  I do not trust the dyes and other chemicals they use at all.  Prices are high for this garbage, and I don't intend to use it!  I will do what I can with my huge stash of real cottons, linens, silks and wools from now on. 


Friday, April 20, 2012

Studio Re-Do

Now, with taxes finally out of the way, I can let my brain wander back to creative pursuits and believe me there are plenty of ideas waiting to be born.  For an embarrassingly long time,  I have wanted to clear the clutter from my studio and create a wonderful space for designing and dreaming up new projects.  With so many creative artisans out on the web now, inspiration is often just a click away.  Feeling rather low a few days ago, as Murphy's Law seemed to be preventing me from the simple task of e-filing and printing out my tax forms to mail, I took a break on Pinterest and found a beautiful photo of Tammy Gilley's studio.  Imagine my joy at finding that she has blogged her studio re-do with before and after photos!  I could hardly believe that her studio was nearly as cluttered as mine where just walking through is a serious challenge.

I have decided that I am going to reward myself with my own studio re-do, and share the process with you here over the coming weeks.  With this promise, perhaps I will stay on track and actually finish.  I have begun my re-do with a very simple project to organize my growing stash of beads.  This has been part of a plan for a while now, and a reward to myself for getting through taxes.  I found a huge oil pan, the kind use use under a car that leaks onto the garage floor, for $12.  You can find these in various shapes and sizes, but this was the largest and the least expensive.  Also, and very important is that it HAS to be magnetic.  Take a small magnet shopping with you to test the metal.

Now then, since the pan is galvanized steel, it can be subject to rust.  Because of this, I did not want to screw it directly to the wall.  I had on hand some rubber faucet repair washers, and used them behind the pan to raise it off the wall (glue in place).  I used long screws that I had purchased complete with toggles and drilled a hole in each corner of the pan large enough for the screw to pass through easily.  Before gluing the washers on, I used the pan as a guide to mark the wall where holes needed to be.  After drilling holes large enough to insert the toggles, and getting the toggles hammered into the wall, I then held the pan in place and tightened down the screws.  As you can see, my pan sits right behind the door.  It is a perfect fit, and does not protrude to interfere with the door standing open.  I can easily reach any of the tins here, and the rest of the wall space is open for decor or other storage.

Next, all that was needed was to add the tins to hold the beads.  Since my daughter-in-law had already done a project like this for her spices in the kitchen, she had done the shopping legwork and I knew right where to find the best deal.  Michael's Crafts had them in the bridal favor section of the store in a tub holding 30 tins for about $17.  Since they were on sale when I went in, I bought three of the tubs because I have quite a lot of beads, and the pan will hold all of these and perhaps even more.  My DIL used magnetic tape for her tins, but I was concerned about the weight of the beads, and a quick inquiry with a salesperson confirmed that the tape was not magnetic enough to keep the bead tins from sliding.  So, instead I purchased small round magnets, a pack of 50 was $7.  

Using E6000 glue -in a well ventilated area! I placed a small dab of each magnet and popped it on the center-back of a tin. Patience is the next step.  Gotta give the glue time to set up properly before placing it on the pan or the tin will fall off the magnet.  ...Yah, I am not known for patience.  I had some tins that already held beads, but I highly recommend doing the gluing before filling the tins.  These tins are not very substantial, and will require gentle handling, so filling them before the glue just complicates things a little.

Once the glue is really set though, you are ready to have fun placing and organizing the tins on your pan.  I have not completely filled all mine yet, as I got so excited that I wanted to post this immediately, telling the world about the beginning of my studio re-do.  The plan is to organize them by color and type.  I can't wait to see them all in place, with an at-a-glance view of what is available for my projects.


Thursday, February 2, 2012

I Love Pinterest!

It's not often that I feel compelled to rave over some internet site, especially one that makes me spend so much time on it.  (tongue in cheek there)   However, after months of trying to persuade me to join Pinterest, that giant internet photo album, my son finally got me by pinning a few of my jewelry photos to a board on his page.  I know it was all ego, but I was curious.  Now, after only about one week, I find myself spending far too much time there.  ...Or am I?  As I ponder on this, I realize that Pinterest has done something that I would have thought impossible.  Using Pinterest is like being given a million dollars and told to go shopping for whatever you like.  Reminding me of my childhood, and that of so many of my friends, when we spent hours pouring through the Sears catalogs looking for things we loved.  We would cut out pictures of toys that we dreamed about owning, clothing, and anything else our imaginations could conjure from those pages.  Now, here I am again, "pinning" (a quick click process) favorite things as fast as I can to boards that keep multiplying.  Just as quickly as I can paste, someone else will see those things and re-pin them to their own boards.  Then, there are those who decide that they like your taste so much that they want to follow you.  Yeh, ...saves them the time of looking for things on their own.  I am finding that so many of my own followers, who are really a small growing handful, are all wanting to have secret little getaways, gypsy wagons to drive off into the sunset in, and rustic little cabins or grand castles (or both).  We all have crafty sides and DIY.  We all have fantastical imaginations and love faerie bowers.  We sew, we build, and that is the beauty of Pinterest.  Pinterest is the place where dreams are born and grow, built photo by photo.

Already, I have new projects planned and raring to go.  I have had an old clock body that is probably a hundred years old.  Gorgeously carved, and with burled walnut on its frame, my father and I tried to restore it many years ago.  It had been chewed by squirrels in an old garage attic.  I re-carved floral medallions and he built a new frame for part of it.  It was ready for "more" and yet I never could decide what to do with it.  Now, after Pinterest, I have the plan to mount a newer clock, that I have had in my kitchen, within its face, and use the bottom part where the pendulum would have shown as a tiny shelf for display.  Finally, after all these years, ...and all because of Pinterest photos getting my brain working in a different direction. .

Saturday, December 3, 2011

The Necklace that toyed itself into existence


My latest creative pursuit is a necklace that started with one of those ugly beads. It was elongated, and a drab shade of orangey-rusty-brown. Really an ugly thing. Lately, however, I have been looking at this sort of thing as a challenge to create something that exonerates it and makes it beautiful in its own way. To begin, the bead was added to a rosary type link and wire wrapped, continuing the wrapping to spiral about the bead. In the spiraling I added small orange seed beads to help hide it. It looked better, but what do you do with one rather large ugly bead wrapped with wire and decorated with seed beads. OK, being me, I made it the focal point. In my last necklace, the bead was the focal, but this time, the bead didn't carry enough design interest to make on its own. I set it aside, and was just playing with wire, created a triangular spiral that waved off at the end. ...Had no idea what to do with that either! Somehow, ...maybe they bumped together, and the idea of using them together began taking shape. Hanging off the lower edge of the triangle, the forming pendant was somewhat interesting, but was lacking still. The focus really needed to go to something else.

Rocks. I love rocks. A few weeks back, I had found a small egg-shaped river stone that was in the garden
path in my backyard. It was a stone that just told me that it was meant to be more than a part of the path, going unnoticed and anonymous. At the very least it would have been happy as a worry stone, residing in a pocket and caressed occasionally, connecting the bearer with a sense of Mother Earth and grounding. The desperate mind will try anything, and so the river stone found a new place to rest. Wrapping it was a little challenging because there were no dents or corners to hold the wrapping wire, but after playing around with it I finally came up with a satisfying result. The pendant was looking very primitive and somehow talisman-like.

Next, I searched through the diminishing supply of ugly beads to find the drabbest, dingy gray rounds I could find. They needed to look earthy and natural. Adding those and a few more primitive wire links, it began to feel important. However, it needed more prestige. How about some verdigris? Just like the beard of an old man, it got more credible in age. A homemade recipe, I used:
  • 2 parts white vinegar
  • 1 part non-sudsy ammonia
  • 1/2 part non-iodized salt

Put these ingredients into a spray bottle and mist the piece. The chemical reaction starts very quickly. Spray a few more times. Remove the piece to a paper towel and allow to dry and sit overnight. The "rusting" process will continue, and the next day you can see the results. Mine were a bit too green, moving the necklace into a different color range, so I washed it and rubbed some of it off. Once dry, I was able to move into adding the fiber part to the neck. Now, the Talisman came together quickly, and this is the result....

Mother Earth's Talisman Necklace

Sunday, November 13, 2011

The Ugly Bead Necklace Finished


I did it! I got thorough my self-imposed challenge to create something useful out of the ugliest beads I have. There were even some very nice compliments on photos I posted in my Flickr group. One person said it looked like "a party on a chain." ...Love that idea, and as the chain grew, the party got more carefree. It became a friend rather than an opponent. My ugly friend encouraged permissiveness, ...an anything goes approach. After all, there was absolutely nothing to be lost, I was starting at the bottom of the barrel with this. All I was contributing was a little effort, and that was of value in itself because I was getting more practice. .

Starting at the Bottom

As I was creating this piece, I found myself going through an incredible thought process. Every so often, I would question the validity of
spending time on creating something worthwhile with such a sorry-looking batch of components: ugly, misshapen, unmatched, left-over cheap glass beads bought in bulk when I first got interested in beading, and crazy, imperfect forged metal practice pieces I had crafted of copper wire as learned in the BuildZone jewelry making course.


The Process

As the necklace grew, it took me through some interesting thoughts. Beginning with a lot of self-doubts (those Gremlins I blogged about a few posts back), I was not at all sure of why I took this challenge on. Why would anyone in their right mind start creating with a bunch of stuff that seemed to say "just put me in the trash!" Isn't is much nicer to think about having gorgeous materials and what the end result of silver and gemstones could be? What was driving me? ...stubbornness? ...a sense of frugality? ...a "way out" excuse for defeat? I am really not sure.

Yet the ugly bead necklace grew, and as it grew, I felt a sense of acceptance. It allowed me to free myself of any constraints that might have held me back. I gave myself over to the spirit of freedom, and creative energy flowed through my braincells and into my fingertips. I ceased to think so much and just did what felt right with each added link. It didn't have to be anything but ugly, and yet with each link I started to like it more and more. A strange sort of beauty was unfolding in my hands and although I knew each imperfection well, I felt like I was forging a life. Out of ugliness and pain came joy and freedom, and a thing of carefree beauty. It doesn't matter if it is of the basest materials because it has a spirit of the highest nature. Maybe it has a "face" that only a mother can love, but this is one child I love to look at.

The Sweet Finish

I may add a few more ribbon tails, and a random dangle here and there, but this child is birthed. As I look at this piece, I am thinking many thoughts so different than those that weighed me down at the start. It reminds me that beauty is only skin deep, but also that just because something isn't always beautiful by most standards, doesn't mean that it has no beauty or value in and of itself. It reminds me that beauty can be found wherever we look for it, and that we should do what we love never separating ourselves from the Creator within. In all things there is purpose, and that our intent and openness can lead us to a beauty that we are not always aware of. I feel a real sense of serenity in that.


May you find beauty and serenity in your day.

Sunday, December 5, 2010

More Fibula Pins!


I have been having fun this weekend. Creating is always fun. ...Sometimes frustrating, but all the more rewarding in the end. Last weekend, we all went to the Gem & Mineral Show at the fairgrounds. I bought a few beads and geodes, ...not much, but my intention was to dabble. Now, I really wish I had been far more indulgent, as I could make a few of these every day. Each one has its own character, and males me feel (in my own mind anyway) just the teeniest bit akin to great sculptors such a Michelangelo. Yeah, I know that's a stretch, but simply putting oneself into the position of taking a naturally beautiful thing and then attempting to co-create with it is awesome. Here is what I did....

I have already worn the Blue pin with my Jane Thornley Organic Wrap. It held it on and in place perfectly.
PS: I know I am just a beginner

Wednesday, December 1, 2010

I Think I Got Caught In A Time Warp


Where has this month gone? I am absolutely aghast that it is now at the end of the month, and we are ready to rush headlong into the holiday season. Saying that I have been busy is an understatement.I came up with yet another option for a shrug closure. I simply found a twig in the back yarn that needed pruning, and then trimmed it to the right length. After stripping the outer bark off, as well as scraping the green inner bark off too, I let it dry for a few days. Then, I shaped and smoothed it with sandpaper, added some stain and paint, and let it dry. I am able to easily push the twig into the stitches on each center front of the garment, and then slip a tie I created from icord with bead clusters on each end, over the ends of the twig. It looks very Oriental, somewhat Zen-ish, and adds a simple yet eloquent effect.
There is a new project on the needles now too. After buying some yarn that took my fancy a few months ago, and having a few frustrating tries to knit it into something, I almost gave up hope that it would come out looking like anything I wanted. The yarns outstanding feature was that it is cream with flecks of orange and green. Attempts to combine it with with those solid colors made me gag. Not to be daunted, I got crazy one day and just began adding in strips of yarn to the knitting, and leaving tails hanging everywhere. ...And I liked it! This project is a very simple top-down knit garment that is being designed as I go along. At this point, it is a cropped top, with a U-shaped neckline and rust picot edging trim at the dropped shoulder edge and around the hem, I plan to add length and do this in sampler panels of color and pattern, keeping it all as simple as possible.

This past weekend, was the annual Gem & Mineral Show. I haven't missed one in over 20 years now. I just love going and talking to the rockhounds, and getting to see and hold beautiful crystals from all over the world. This year, I was surprised to see ancient Chinese "Prayer Wheels." These are mostly small discs, with a few characters carved into the sides. They were traditionally placed into the graves of those departed loved ones, to give them an eternal prayer for happiness and good fortune on the other side. The vendor told me that plans for a new dam meant that many graves had to be moved. In the process, these prayer wheels were removed, and ended up being "available for sale." To put it as my husband said: "Some things aren't meant to be sold." I did not bring one of those home with me, but I did find several small geode pieces to make into more fibula pins. Here is the first one, which I made yesterday.


...And may the blessings remain with the ancestors.

Friday, October 22, 2010

I Sold Something!


Yes I did! I am so excited that I can say this. This week, and it is not over yet, an old friend has been hostessing a home boutique featuring hand made items. Years ago, she had a store that was dedicated to heirloom sewing. After leaving that business, she now teaches out of her home studio, and once a year, she clears out the entire downstairs of her home to host this event. Last night, "ladies night out," and a chance to meet the artisans, was fabulous, and I had to keep checking to make sure my eyeballs were still in my head. There was just so much to see.

My friend, Barbara, of B3Fibers, took several skeins of hand spun yarn, and a number of the most whimsical tea cozies I have ever seen. I contributed several items of my own, and was thrilled to find that the scarf I named "Leaves & Dewdrops" had sold. Yippee!!! I am going to need to create a few more of these, as they are on my daughter-in-laws favorites list. I do have a few already knit, but they do need their decorations of bead conglomerates. So, here's hoping that my little green creation will find a loving home, and be a frequent adornment of someone's neck. Goodbye and good fortune "Leaves & Dewdrops!"

Tuesday, September 30, 2008

Not just another stitch marker…

I HAVE THIS NEED TO BE DIFFERENT. I really cannot tolerate sameness in myself. It’s OK for others, but if life doesn’t have extravagant variety, then why do another day? So, in seeking the more unusual, creative, and colorfully unique, I have taken roads less traveled by others. Blame it on my inner gypsy. I call her Shalimar. Shalimar has the quality of a multi-faceted crystalline jewel. She appears to be different from every angle. Sometimes she’s raw and uncut by nature, often childlike and playful, and other times polished and classy, …but always unique. At times, she can be very demanding, and make me do things “the hard way,” and sometimes she gets me into trouble. …Consider the time she had had enough of a painful and confining marriage and ran off to California and learned how to do acupressure massage and play with energy. …Or the times she just had to go to China. …And how many other brides have Chinese Lion dancing at their weddings? …Especially when they aren’t even Chinese? (She said that a wedding ceremony should be meaningful and fun for the groom too, and when one marries a devoted Kung Fu man, that’s the sort of thing to do.) One thing for certain, following my inner gypsy has made life very interesting. She is responsible for these stitch markers: I absolutely advocate making your own stitch markers. They are so much fun and easy to do, and allow you the opportunity and freedom to express your own inner desires for creativity.

What you need:
beads of your choice, size 18 gauge wire, and a set of inexpensive beading tools (round-nose pliers, wire cutters (an old scissors may do), a small hammer, and an old metal knitting needle larger than the size you will be knitting with. I have two different sized sets of markers. One is for larger needles, and the other I use on needles up to size 8).

What to do:

  1. Determine how long you will need to cut your wire by doing a demo. I cut mine about 8 inches long.
  2. Start by winding the wire around the round-nose pliers to create the center of the spiral. Then, hold the center between you thumb and fingers, and begin turning to wrap the wire around the center. Deviate as you wish. However, do keep in mind that by keeping the twists and turns as compact (less open) as possible, will minimize the stitch marker getting caught in your knitting. I have learned NOT to use these with any lacey knitting. The combination is impossible. Hammer this part gentle to flatten it slightly. This will help keep it in shape.
  3. Add your beads as you wish. It is best not to have a dangle that is long or heavy.
  4. Hold the top of your dangle with the needle-nose pliers so that it is snug. Then, bend the wire at a 90-degree angle. Hold the top of the bent wire close to the bend. Wrap the wire around the pliers near to the size of your knitting needle. Insert the knitting needle, adjusting the size of the circle.
  5. Holding the circle firmly, begin to wrap the wire around its stem. Wrap closely, and snip it close with the wire cutter. Smooth the end into the stem so that it will not catch, feeling even to the touch.

Monday, July 28, 2008

I love my cardi wrap


I love my cardi wrap. I got the idea after seeing a few others online, and wanted something similar, but different. Each knitted cardi I saw was either too blocky looking, too un-glamorous,too long, or too lacey. I wanted colorful, sort of substantial for warmth, sexy and fun. …And glitz. …At least a little. So, free range knitting it was, and irregular, sleek and body friendly, and beads that drip off the edges seductively. I made sleeves for it, but I liked the look without them, so much so, that I haven’t yet attached them. I will need to attach them in such away as to be able to detach, and re-attach, whenever the whim takes me. It hugs me without bulk, and the colors and yarns worked out so well. They reminded me of our South Carolina peach orchards, and thus it got a name: The Peach Orchard Cardi Wrap.
Writing up the pattern for the cardi wrap was a bear of a job. It took longer than it did to knit. Much longer! I am such a perfectionist that I wrote down everything I could think of to write, and the cardi wrap pattern is a full 13 pages long. The dressmaker came out, and I did illustrations for cutting strippons. Yes, that is a made up name. Jane Thornley dubbed my using fabric strips that on one occasion, and the name stuck. Strippons are thin strips of fabric that I like to tie together, creating little flags of fabric, into a long yarn. You can see them quite clearly in the photo to the right. Its the peachy part of the cardi wrap. I love texture! ...Love to see it and touch it.  You will find the pattern here:  Peach Orchard Cardi Wrap
I finished the wrap just in time to wear to my oldest son's wedding at the end of March, but even then the weather was a little too warm.

Now, it is way too warm to wear it, as our summers are long, hot, and humid.
Come Fall though, it will be out in all its splendor, even though the peach trees will be bare.
For a lot of information on free range knitting, and some free patterns to explore using this style, visit my friend Jane's website. JaneThornley.com